What's inside
- Start by measuring your starter kit
- Compare bag sizes by usable space, not advertised volume
- Match the pocket layout to your workflow
- Check the base before choosing the fabric
- Calculate the real carrying load
- Use this decision matrix
- Durability details that listings often omit
- Pack and maintain the bag correctly
- Bottom line
- Start by measuring your starter kit
- Compare bag sizes by usable space, not advertised volume
- Match the pocket layout to your workflow
- Check the base before choosing the fabric
- Calculate the real carrying load
- Use this decision matrix
- Durability details that listings often omit
- Pack and maintain the bag correctly
- Bottom line
As an Amazon Associate I earn from qualifying purchases. This post may contain affiliate links at no extra cost to you.
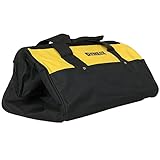
The best cordless tool storage bag for a beginner is usually a medium-sized, rigid-base bag about 16–20 inches long, with 20–30 litres of usable space, reinforced handles, and pockets arranged around the tools you actually own—not the largest bag you can afford.
This cordless tool storage bag buying guide for beginners focuses on the details that determine whether a starter kit stays protected and easy to carry: bag dimensions, pocket layout, base construction, and load capacity. A bag that looks roomy in a product listing can still be awkward if its opening is narrow, its pockets waste space, or its base collapses under batteries and chargers.
As an Amazon Associate we earn from qualifying purchases at no extra cost to you.



Start by measuring your starter kit
Before comparing bags, place your tools, batteries, charger, and commonly used accessories on a table. Measure the longest item, the tallest item, and the approximate footprint of everything grouped together. A typical starter cordless kit might include:
- One drill-driver or impact driver, approximately 7–9 inches long
- One compact circular saw or oscillating multi-tool, approximately 10–14 inches long
- Two batteries, each roughly 4–7 inches long depending on capacity
- A charger measuring approximately 6–9 inches across
- A small bit set, tape measure, safety glasses, and gloves
Allow at least 1–2 inches of clearance around the group. Tools should not need to be forced through the zipper opening, and batteries should not be squeezed against hard tool edges. For this type of kit, an internal capacity of about 20–30 litres is a practical starting point. A bag rated at 40 litres may carry more, but it can encourage overloading and become uncomfortable when filled with batteries and accessories.
Compare bag sizes by usable space, not advertised volume
Bag dimensions are normally listed as length × width × height, but those outside measurements include fabric, padding, handles, and sometimes a protruding base. A bag measuring 18 × 10 × 10 inches has a theoretical outside volume of about 32 litres, but its useful internal volume may be closer to 24–27 litres.
Opening shape matters as much as capacity. A wide U-shaped zipper lets you place a compact saw or charger flat inside. A narrow top opening can make a tall bag difficult to pack even when the stated volume is generous.
| Bag category | Typical outside size | Approximate usable capacity | Suitable starter-kit contents | Typical empty weight |
|---|---|---|---|---|
| Compact | 14–16 × 7–9 × 8–10 in | 12–18 L | One drill, one or two batteries, charger, bits | 1.5–2.5 lb |
| Medium | 16–20 × 9–11 × 9–12 in | 20–30 L | Two or three cordless tools, batteries, charger, hand tools | 2.5–4.5 lb |
| Large | 20–24 × 11–14 × 11–14 in | 32–45 L | Several tools, large batteries, accessories, protective equipment | 4–7 lb |
For occasional home repairs, the medium category is generally the best balance. Choose compact if storage space and portability matter more than expansion. Choose large only if you already own several tools or expect to add them soon; carrying an oversized half-empty bag can make tools shift and increases the temptation to pack unnecessary weight.
Match the pocket layout to your workflow
Pockets affect speed and protection. A bag with many small slots can keep screwdrivers and bits organized, but it may leave no practical place for a charger or bulky battery. A completely open compartment is flexible, but loose tools can collide and become difficult to find.
For a basic drill-and-driver kit
Look for two or more exterior pockets, six to ten narrow internal pockets, and a central compartment wide enough for a charger. Keep drill bits, driver bits, tape, pencils, and fasteners in the smaller pockets. The main compartment should hold the tools and batteries without stacking them under heavy hand tools.
For a growing cordless collection
Prioritize one large, unobstructed compartment with removable dividers or a padded separator. Fixed pockets can become unusable when your tool shapes change. A pair of end pockets is useful for batteries, but check that the pockets close securely and do not allow batteries to press directly against the zipper.
For frequent job-site trips
Choose reinforced exterior pockets with covered openings, a padded shoulder strap, and handles that remain comfortable when the bag is full. Open mesh pockets are convenient for gloves and safety glasses, but they offer less protection from sawdust, rain, and snagging than covered fabric pockets.
Check the base before choosing the fabric
The base is often the first part to show weakness because it receives impact, moisture, and concentrated weight. A fabric-only bottom can sag when loaded and may drag across concrete or damp ground. Prefer a sewn-in or molded base with a wipe-clean surface and some separation from the floor.
- Fabric base: light and flexible, but more likely to absorb moisture and wear at corners.
- Reinforced fabric base: a reasonable compromise for home use; look for extra layers, edge binding, and dense stitching.
- Molded plastic or rubberized base: better for wet floors and heavy batteries, although it adds weight and may crack if severely abused.
A raised base is especially useful if you often work in garages, unfinished rooms, or outdoor areas. Inspect the transition between the hard base and the fabric walls. This seam carries much of the load, so wide binding and multiple rows of stitching are more meaningful than a high fabric-denier number alone.
Calculate the real carrying load
Manufacturers may state a maximum load, but your practical target should be lower. Add the weight of the contents, then include the empty bag. For example:
- Two cordless tools: 4.5 lb total
- Two batteries: 3.0 lb total
- Charger: 1.5 lb
- Bits, fasteners, gloves, and tape: 2.0 lb
- Medium bag: 3.5 lb
The total is 14.5 lb. If the bag’s stated maximum load is 20 lb, that leaves only a 5.5 lb margin. That may be adequate, but repeatedly carrying the bag at 70–80% of its rating can accelerate handle, seam, and zipper wear. For regular use, aim for roughly 50–70% of the stated maximum whenever possible.
Capacity is not the same as weight rating. A large, lightly built bag may hold 35 litres but be less suitable for heavy batteries than a smaller bag with reinforced handles and a rigid bottom.
Use this decision matrix
| Your situation | Recommended specification | Why |
|---|---|---|
| Low budget, occasional household repairs | 14–18 L; reinforced fabric base; 25–35 lb rated load | Keeps cost and empty weight down while covering a small kit |
| Beginner adding tools over the next year | 20–30 L; removable dividers; 35–50 lb rated load | Provides room for extra tools without becoming excessively bulky |
| Limited closet or vehicle space | Compact rectangular shape; 14–18 L; collapsible sides | Stores more easily and wastes less space around the kit |
| Weekly workshop or job-site use | 20–30 L; molded base; padded strap; reinforced handles | Improves comfort and resistance to repeated abrasion |
| Wet or dusty working conditions | Raised waterproof-style base; covered pockets; wipe-clean lining | Reduces moisture and debris reaching tools and batteries |
Durability details that listings often omit
Examine the stress points rather than focusing only on the outer fabric. The handle attachment should have broad reinforcement patches and stitching that continues down the bag wall. Handles that are merely sewn into a narrow top hem can pull loose when the bag is lifted by one side.
Zippers commonly fail because the bag is overfilled, not because the zipper itself is defective. Leave enough space for the zipper track to close without stretching the walls. Metal pulls are convenient with gloves, while oversized molded pulls may be easier to use in cold weather. Neither compensates for a distorted opening.
Expect the bottom corners, handle padding, shoulder-strap clips, and pocket edges to wear first. Do not place sharp blades, loose drill bits, or unprotected metal brackets in exterior pockets. Use small cases or pouches for bits and fasteners so they do not puncture the lining or battery insulation.
Pack and maintain the bag correctly
- Put the heaviest items, usually batteries and the charger, low and near the center.
- Place tools upright or side by side so their switches and housings do not press against each other.
- Keep bits, screws, and small accessories in closed pouches or dedicated pockets.
- Use the exterior pockets for light items such as gloves, a tape measure, and safety glasses.
- Lift the packed bag once and check whether it tilts, sags, or pulls sharply at one handle.
Remove batteries from tools before storing them, especially when the bag will remain in a vehicle or workshop for an extended period. Brush or vacuum out sawdust, wipe dirty fabric with a damp cloth, and let the bag dry fully before closing it. Avoid saturating padded sections unless the care instructions specifically permit washing; trapped moisture can create odors and corrode metal components.
Bottom line
For most beginners, choose a 16–20-inch medium bag with 20–30 litres of usable space, a reinforced or molded base, flexible internal organization, and a load rating comfortably above your calculated kit weight. Measure the tools first, leave clearance around batteries and chargers, and treat pocket layout and handle construction as functional specifications—not cosmetic extras. The right bag will keep a starter cordless kit balanced, accessible, and easier to protect as the collection grows.