
What's inside
- 1. Which BLACK+DECKER Belt Sander Do You Have?
- 2. What Is a BLACK+DECKER Belt Sander Used For?
- 3. How to Choose the Correct Sanding Belt
- 4. How to Use a BLACK+DECKER Belt Sander Safely
- 5. How to Maintain a BLACK+DECKER Belt Sander
- 6. Common BLACK+DECKER Belt Sander Problems
- 7. Is a BLACK+DECKER Belt Sander Worth Buying?
- Frequently Asked Questions
- Final Verdict
- 1. Which BLACK+DECKER Belt Sander Do You Have?
- 2. What Is a BLACK+DECKER Belt Sander Used For?
- 3. How to Choose the Correct Sanding Belt
- 4. How to Use a BLACK+DECKER Belt Sander Safely
- 5. How to Maintain a BLACK+DECKER Belt Sander
- 6. Common BLACK+DECKER Belt Sander Problems
- 7. Is a BLACK+DECKER Belt Sander Worth Buying?
- Frequently Asked Questions
- Final Verdict
As an Amazon Associate I earn from qualifying purchases. This post may contain affiliate links at no extra cost to you.
A BLACK+DECKER belt sander is a practical choice for removing material quickly from large wooden surfaces, smoothing rough boards, and preparing doors, tables, and other projects for refinishing. However, the right model depends on the work: a conventional belt sander suits broad, flat surfaces, while a narrow Powerfile-style sander is better for edges, curves, and confined spaces.
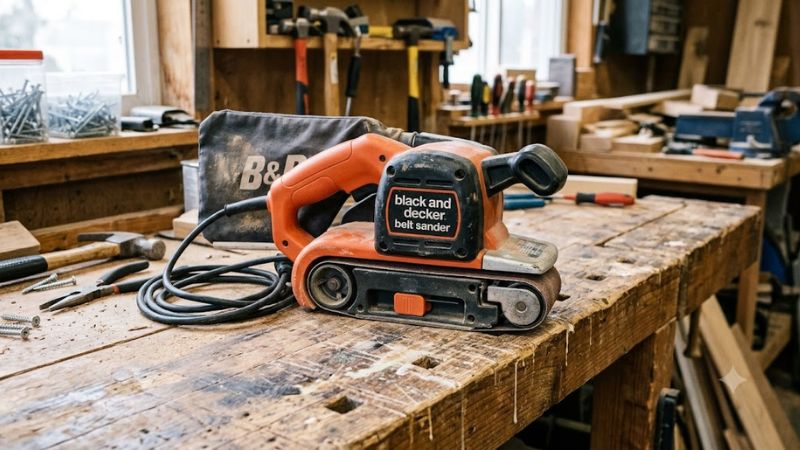
The most important first step is identifying your exact model. BLACK+DECKER sells or has sold different belt sanders across regional markets, and their belt dimensions, controls, power ratings, and accessories are not necessarily interchangeable. In the United States, the DS321 is a recognizable 3-inch-by-21-inch belt sander, while the PF260 is a narrow precision belt sander. International models include the KA86 and KA88, which have different belt dimensions. Manufacturer documentation should take priority over assumptions based on appearance or brand name.
This guide explains how to identify the right BLACK+DECKER belt sander, select replacement abrasives, use the tool safely, and troubleshoot common problems without relying on unverified specifications or invented performance claims.
1. Which BLACK+DECKER Belt Sander Do You Have?
Start by checking the model number on the tool’s nameplate. If you need a replacement part or the correct instruction manual, also record the type number and date code when available. BLACK+DECKER’s official support guidance explains that the type number may be needed to locate the correct parts diagram and manual.
| Model | Tool type | Verified identifying information | Best suited to |
| DS321 | Conventional belt sander | 3 in × 21 in (approximately 76 × 533 mm) belt | General sanding of broad wooden surfaces |
| PF260 | Precision Powerfile belt sander | 1/2-inch sanding arm; variable-speed design | Narrow areas and detailed material removal |
| KA86 | Conventional belt sander | 720 W; 75 × 457 mm belt | Large surfaces such as floorboards and tables |
| KA88 | Conventional belt sander | 720 W; 75 × 533 mm belt | Large-surface sanding |
Model specifications above come from the manufacturer’s available product information and manuals. Availability and exact package contents vary by region and model version.
Conventional belt sander vs. Powerfile
Conventional belt sander
A conventional model has a relatively wide abrasive belt running around two rollers. Its broad contact area makes it useful for removing material from wooden boards, doors, tabletops, and similar surfaces. It can remove material aggressively, so controlling the tool is essential.
Powerfile or precision belt sander
A Powerfile uses a narrow sanding arm to reach places a wide belt cannot easily access. Depending on the included arm and approved abrasive, it can help with shaping, sanding edges, and working in narrow openings. It is not a direct substitute for a wide belt sander when the goal is to flatten a large tabletop.
Buying tip: Do not order a sanding belt based only on the words “BLACK+DECKER belt sander.” Match the replacement to the precise model and required dimensions.
2. What Is a BLACK+DECKER Belt Sander Used For?
A belt sander is designed for relatively fast material removal. The abrasive belt moves continuously around rollers, allowing it to remove surface material more aggressively than many finishing sanders.
Common applications include:
- Smoothing rough lumber: Remove surface irregularities before finer sanding.
- Preparing doors and tabletops: Reduce roughness and help prepare suitable bare wood for finishing.
- Removing old finishes: Sand away compatible paint or varnish when the coating and substrate can be worked safely.
- Smoothing edges: Refine wooden edges while maintaining control of the tool.
- Detailed sanding: Use a Powerfile-style model for tight spaces or irregular contours within the tool’s intended applications.
A conventional belt sander is not the best choice for every finishing task. A random-orbit sander is often more suitable for general finish preparation, while a detail sander can reach small corners that a wide belt cannot access.
When should you avoid using one?
Avoid using a conventional belt sander when the task requires delicate material removal, a polished finish straight from the tool, or precise work in a narrow recess. Excessive sanding can create depressions, round over edges, or cut through a thin veneer.
Before sanding old paint, establish whether it may contain lead or other hazardous substances. Do not dry-sand a potentially hazardous coating until you have determined the appropriate handling method. Ordinary dust collection is not a substitute for a suitable exposure-control plan.
3. How to Choose the Correct Sanding Belt
The replacement belt must match the sander’s required dimensions and intended use. Grit selection then determines how aggressively the abrasive removes material.
Belt dimensions matter
Check three things before buying replacement belts:
- Length: The belt must travel correctly around both rollers.
- Width: The abrasive must match the width of the sanding mechanism.
- Direction of travel: If the belt has directional arrows, install it according to the tool’s instructions.
For example, the BLACK+DECKER DS321 uses a 3 × 21-inch belt, while the KA86 uses a 75 × 457 mm belt. These dimensions are not interchangeable. The PF260 uses a narrow precision sanding arm, so it requires the appropriate abrasive for that system rather than a conventional wide belt.
Choosing the right grit
The following are general abrasive-selection guidelines, not manufacturer-prescribed settings for every BLACK+DECKER model.
| Sandpaper grit | Typical purpose | Main caution |
| 40–60 | Heavy stock removal and rough surfaces | Removes material quickly; gouging is easier |
| 80–100 | General smoothing and moderate material removal | May still leave visible sanding marks |
| 120–150 | Refining a surface after coarser sanding | May be too aggressive for some delicate finishes |
| 180–220 | Fine preparation before suitable finishes | Not always required for every coating or wood species |
The correct sequence depends on the material, the existing surface, and the finish you plan to apply. A badly uneven board may need a coarser starting grit than an already smooth panel. On the other hand, starting too coarse can create scratches that require substantial additional sanding to remove.
Practical rule: Start with the least aggressive grit that can reasonably do the job, then progress to finer abrasives as needed. Test on an inconspicuous area first.
4. How to Use a BLACK+DECKER Belt Sander Safely
This procedure is for conventional handheld belt sanders. Your exact model’s manual takes precedence, especially for belt tracking, switches, speed controls, and accessory changes.
Before you start
Prepare the following:
- The correct BLACK+DECKER belt sander and compatible abrasive.
- A stable workbench and clamps or another suitable work-holding method.
- Safety glasses or appropriate eye protection.
- Hearing protection and respiratory protection appropriate to the dust hazard.
- Effective dust extraction and suitable ventilation.
- A clear working area without loose clothing, jewelry, or other items that could become entangled.
Check the power cord, plug, switch, belt, rollers, belt cover, and dust-collection components for damage. Do not use a damaged tool or one with a malfunctioning switch. For a corded model, verify that its nameplate voltage and plug are suitable for the local power supply. A US-market tool should not be assumed compatible with a different regional electrical supply.
The DS321 manual specifically warns about sanding dust, requires appropriate eye protection, and instructs users to secure the workpiece.
Step-by-step sanding procedure
Step 1: Secure the workpiece
Clamp the board or panel to a stable workbench. Make sure it cannot shift, tip, or move into the sanding belt. Keep clamps clear of the tool’s travel path.
Step 2: Inspect and install the belt
Disconnect the power supply before changing the abrasive. Release belt tension using the model’s designated mechanism, fit the correct belt, and align its directional arrows if present. Restore tension as instructed and verify that guards and covers are correctly positioned.
Step 3: Put on protective equipment
Wear eye and hearing protection and respiratory protection appropriate to the material and dust exposure. Use effective dust extraction, and keep bystanders away from the work area.
Step 4: Start the sander before contacting the wood
Hold the tool firmly with both hands at its intended gripping points. Start it while the abrasive is clear of the workpiece, then lower it carefully onto the surface. Follow the manual’s instructions for any model-specific tracking check.
Step 5: Move steadily with light pressure
Keep the base controlled and move the sander continuously. On ordinary wood-sanding jobs, follow the grain where practical. Let the abrasive do the work rather than forcing the tool down.
Step 6: Check the surface frequently
Switch off and wait for the belt to stop before inspecting the finish. Check for scratches, dips, rounded edges, and uneven areas. Change to a finer grit when the surface is ready.
Step 7: Shut down and clean up
Lift the tool off the workpiece before switching it off, as directed in the DS321 manual. Wait for the belt to stop completely, disconnect the tool before adjustments or cleaning, and collect dust safely.
The illustrations are generic workshop examples, not representations of specific BLACK+DECKER models or their controls. Follow the operating sequence in your tool’s own manual.
How to prevent gouges and uneven sanding
The most common mistake is leaving the sander stationary while its belt is moving against the workpiece. This can quickly create a depression.
To reduce that risk:
- Keep the tool moving at a controlled, consistent pace.
- Avoid excessive downward pressure.
- Do not tilt the sander onto one edge unless the model is specifically designed for that operation.
- Inspect the surface frequently, especially near edges and corners.
- Use a more suitable finishing sander when the task requires fine surface refinement.
A belt sander can remove more material than intended before the operator notices. Practice on scrap material before working on a finished door, valuable furniture, or a thin panel.
5. How to Maintain a BLACK+DECKER Belt Sander
Regular inspection helps identify wear and operating problems before they lead to poor results or damage.
Clean the tool after use
Disconnect the power before cleaning. Remove accumulated dust from accessible exterior surfaces and approved dust-collection components using the method specified in the manual. Keep ventilation openings clear, and do not allow dust or cleaning liquids to enter electrical components.
Do not use a cleaning method that could force debris deeper into the housing or damage electrical insulation.
Inspect the sanding belt
Replace the abrasive when it is worn, damaged, clogged, or no longer sanding effectively. A clogged belt can produce more heat and poor results, while a damaged belt may track improperly or break during use.
Use only abrasives intended for the tool and application. Do not install a belt with damaged joints or incorrect dimensions.
Check belt tracking
Belt tracking determines whether the abrasive remains properly aligned on the rollers. If the belt repeatedly moves toward an edge, rubs against the housing, or slips off, stop using the tool and disconnect its power.
Follow the specific manual’s adjustment procedure. Do not assume every BLACK+DECKER model uses the same tracking mechanism: some designs feature automatic tracking, while others use a manual adjustment.
Maintain the dust-collection system
Empty and clean the dust bag or collection system according to the manual. Inspect it for tears, blockages, or damaged fittings. A collection bag reduces some airborne debris but does not eliminate fine dust exposure.
Avoid sanding unknown coatings or materials until you understand the potential hazards and appropriate dust-control requirements.
Store the tool properly
Store the sander in a dry location, protect its cord from cuts and sharp bends, and keep it away from moisture. Before the next use, check the belt, housing, guards, cord, and switch.
If you notice burning smells, unusual mechanical noise, damaged insulation, repeated belt-tracking failures, or smoke, stop using the tool and have it inspected by qualified service personnel.
6. Common BLACK+DECKER Belt Sander Problems
If your sander is not working as expected, start with external checks. Disconnect the power before inspecting the belt, clearing dust, changing accessories, or making adjustments.
| Problem | Possible causes | Recommended action |
| Belt keeps slipping off | Incorrect installation, misalignment, worn components, or tracking problems | Check belt dimensions and installation; follow the model-specific tracking procedure |
| Sander removes material unevenly | Excessive pressure, inconsistent movement, worn abrasive, or an uneven workpiece | Inspect the belt, use controlled passes, and check the surface |
| Sanding performance drops | Clogged or worn belt, unsuitable grit, or a mechanical fault | Replace the abrasive if necessary; stop if the tool appears damaged |
| Excessive dust escapes | Full or blocked dust collector, damaged bag, or ineffective extraction | Disconnect the tool and inspect the approved collection system |
| Tool becomes unusually hot | Excessive pressure, prolonged loading, clogged vents, or a developing fault | Stop, disconnect the tool, and let it cool; investigate before reuse |
| Burning smell or smoke | Possible friction, overheating, belt damage, or electrical failure | Stop immediately, disconnect power if safe, and do not resume until the cause is resolved |
These are possible causes, not confirmed diagnoses. If the belt repeatedly comes off, the switch fails, the tool sparks abnormally, or the motor produces unusual noise, do not dismantle energized equipment or bypass safety mechanisms. Seek qualified service if the issue cannot be resolved using the manufacturer’s approved procedures.
7. Is a BLACK+DECKER Belt Sander Worth Buying?
A BLACK+DECKER belt sander can be a useful workshop tool if you regularly prepare wood, remove material from broad surfaces, or complete renovation projects. The key is choosing a model that matches the workload rather than assuming all belt sanders perform the same function.
It may be a good fit if you:
- Need to remove material from wooden boards or furniture.
- Have a suitable workbench and can secure your workpieces.
- Want a conventional belt sander for broad surfaces or a Powerfile for detailed work.
- Can obtain compatible sanding belts and any required replacement parts.
Consider another tool if you:
- Primarily need a smooth finish with minimal visible sanding marks.
- Work mostly on small corners and intricate details but are considering a wide belt sander.
- Need a cordless tool but the model you are considering is corded.
- Cannot verify the tool’s condition, compatible abrasives, or service support.
For a used BLACK+DECKER sander, inspect the cord, switch, belt mechanism, rollers, housing, dust collector, and guards. Check whether replacement belts and important parts are still available for the exact model. Do not buy a tool with damaged electrical components or missing safety-critical parts simply because the purchase price is low.
Prices and availability vary by model, seller, condition, and region. No current price is quoted here because a reliable, model-specific price for the reader’s intended market has not been established.
Frequently Asked Questions
1. What size sanding belt does a BLACK+DECKER belt sander use?
The required belt size depends on the model. For example, the DS321 uses a 3 × 21-inch belt, while the KA86 uses a 75 × 457 mm belt. Check the model nameplate and instruction manual before ordering a replacement.
2. Can I use any sanding belt with a BLACK+DECKER sander?
No, you must use a belt with the correct dimensions and suitable abrasive characteristics for your model and task. Width and length must match the machine, and directional arrows must be followed where specified. A belt that physically fits is not automatically suitable for the application.
3. How do I change a BLACK+DECKER belt sander belt?
Disconnect the power first, release the belt tension using the designated lever or mechanism, remove the old belt, and install a compatible replacement. Align any directional arrows, restore tension, and follow the manual’s instructions for tracking and inspection before returning to work. The exact mechanism varies by model.
4. Where can I find a BLACK+DECKER belt sander manual?
Use BLACK+DECKER’s official support resources or Tool ServiceNet. Search for the model number and provide the type number when requested; the type number is generally located next to or below the model number. This helps you identify the correct manual and parts diagram.
Final Verdict
A BLACK+DECKER belt sander is worth considering when you need efficient material removal for woodworking or renovation, but the model and abrasive must match the job. Conventional models such as the DS321 and KA86 are designed for broader surfaces, whereas the PF260 Powerfile is intended for precision work in tighter spaces.
Before buying a replacement belt or a used tool, verify the exact model, required abrasive dimensions, electrical compatibility, condition, and parts availability. Before sanding, secure the workpiece, control dust exposure, use appropriate protective equipment, and follow the model-specific manual.
For the best starting point, identify the model number on your existing sander and use it to confirm the correct manual and consumables.
Related guides
More from Amazon
Programs that pair well with the guide above. Offers and eligibility are set by Amazon and may change.
A free business account with business pricing and bulk-buying tools for work, shop or home office.
Create a business accountFree shipping on eligible items, Prime Video and more. Eligible new members can start with a free trial.
Start a Prime free trialAudiobooks and podcasts to listen to on the go. Eligible new members can start with a free trial.
Try Audible freeAd-free music streaming. Eligible new subscribers can start with a free trial.
Try Music Unlimited freeAs an Amazon Associate we earn from qualifying purchases.



Write Your Review
No reviews yet. Be the first to share your experience!