
What's inside
- What Is a Dado Blade for a Table Saw?
- How Does a Dado Blade Work?
- Types of Dado Blades for Table Saws
- How to Choose the Right Dado Blade for Your Table Saw
- Dado Blade vs. Standard Table Saw Blade
- What Projects Can You Complete With a Dado Blade?
- How to Set Up and Use a Dado Blade on a Table Saw
- Dado Blade Safety: Important Risks to Understand
- Common Dado Blade Mistakes to Avoid
- Frequently Asked Questions
- Final Thoughts
- What Is a Dado Blade for a Table Saw?
- How Does a Dado Blade Work?
- Types of Dado Blades for Table Saws
- How to Choose the Right Dado Blade for Your Table Saw
- Dado Blade vs. Standard Table Saw Blade
- What Projects Can You Complete With a Dado Blade?
- How to Set Up and Use a Dado Blade on a Table Saw
- Dado Blade Safety: Important Risks to Understand
- Common Dado Blade Mistakes to Avoid
- Frequently Asked Questions
- Final Thoughts
As an Amazon Associate I earn from qualifying purchases. This post may contain affiliate links at no extra cost to you.
A dado blade for table saw projects allows woodworkers to cut wider grooves, channels, and rabbets than a standard table saw blade can produce in one pass. These cuts are useful when building cabinets, bookshelves, drawers, furniture, and other woodworking projects that require accurate joints. However, not every table saw supports a dado blade, and choosing the wrong stack or installing it incorrectly can create serious safety problems. Before purchasing one, you need to understand blade types, arbor compatibility, cutting width, saw capacity, and the correct setup procedure.
What Is a Dado Blade for a Table Saw?
A dado blade is a specialized circular cutting accessory designed to remove a wider strip of material than a conventional table saw blade. Instead of producing only a narrow kerf, it cuts grooves and other recessed features that accommodate shelves, panels, dividers, and connecting components.
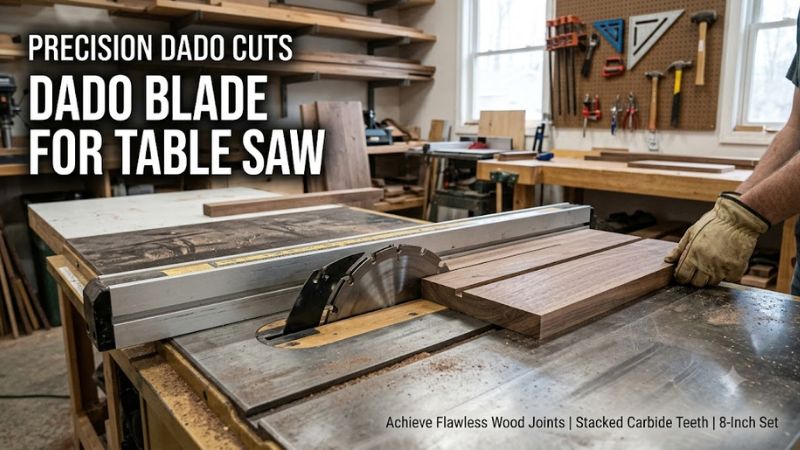
A standard table saw blade typically creates a cut approximately equal to its kerf width. A dado setup combines multiple cutting elements or uses a specialized blade to produce a wider cut.
For example, when building a bookshelf, you may need a groove across the inside surface of a cabinet side panel. The groove supports a shelf and helps keep it aligned. A dado blade can create that channel in a single controlled pass, provided the saw, blade, workpiece, and cutting method are compatible.
Dado blades are commonly used for:
- Cabinet construction and shelf installation.
- Drawer bottoms and furniture components.
- Bookcase and storage-unit assembly.
- Box joints and certain woodworking joinery applications.
- Recessed channels for plywood panels.
- Rabbets along the edges of boards.
- Housing joints in furniture construction.
The important distinction is that a dado blade is not simply a wider replacement for a standard saw blade. It changes the cutting configuration and may require a different throat plate, arbor hardware, guard arrangement, and operating procedure.
How Does a Dado Blade Work?
Most traditional dado blade systems use a stack of cutting components mounted on the table saw arbor.
A typical stacked dado set contains two outside blades and several inner chippers. The outside blades establish the edges of the groove, while the chippers remove material between those edges.
The combined cutting width determines how much material is removed during a pass.
Main Components of a Stacked Dado Set
Outer blades: These establish the two sides of the groove. Their teeth help create relatively clean groove walls.
Chipper blades: These fit between the outer blades and remove the material in the center. Different chipper widths allow the operator to adjust the overall cutting width.
Shims: Thin spacers provide fine adjustments when the available chipper combinations do not produce the desired groove width.
Arbor hardware: The arbor, washer, nut, and available thread engagement hold the blade assembly in position. Their compatibility must be confirmed through the saw manufacturer’s documentation.
Not every dado set uses identical components. Some products have different chipper arrangements, tooth geometries, or adjustment systems. Always follow the instructions supplied with the exact blade set.
What Happens During a Dado Cut?
When the saw runs, the outer blades and chippers rotate together. As the workpiece moves across the cutting area, the assembly removes a wider section of wood than a conventional blade.
The result is a flat-bottomed or near-flat-bottomed groove, depending on the design and condition of the cutting components.
Cut quality depends on several factors:
- Blade geometry and sharpness.
- Correct assembly and spacing.
- Workpiece material and thickness.
- Saw stability and alignment.
- Feed consistency.
- Appropriate support for the workpiece.
- The manufacturer’s permitted operating configuration.
A properly selected setup can reduce the need for multiple passes with a standard blade. However, a wider cutting assembly also increases the importance of checking saw compatibility and following the correct safety procedures.
Types of Dado Blades for Table Saws
There are two main categories worth understanding before choosing a dado accessory.
1. Stacked Dado Blade Sets
The conventional option for adjustable groove widths.
A stacked dado set uses two outer blades, inner chippers, and sometimes shims. The user combines these components to obtain the required cutting width within the manufacturer’s specified range.
Its main advantage is flexibility. Rather than purchasing a separate blade for every groove width, a suitable stack can accommodate several different configurations.
Advantages include:
- Adjustable cutting width.
- Consistent groove dimensions when correctly assembled.
- Suitable for many cabinet and furniture applications.
- Less need for repeated passes with a standard blade.
Limitations include:
- Higher initial cost than some single-blade alternatives.
- More complicated setup.
- Additional storage requirements.
- Compatibility restrictions involving arbor length and saw capacity.
- Greater consequences if components are assembled incorrectly.
A stacked set is generally worth considering for woodworkers who regularly produce cabinets, furniture, drawers, and other projects requiring repeated grooves.
2. Wobble Dado Blades
An alternative design using an adjustable blade angle.
A wobble dado blade uses an adjustable mounting mechanism that tilts the blade relative to the arbor. Changing the angle changes the effective cutting width.
This design differs from a stacked set because it does not rely on several individual cutting elements working together.
Its potential advantage is a simpler accessory arrangement. However, the angled cutting geometry can produce a different groove-bottom finish, and adjustment accuracy depends on the blade’s design and condition.
Wobble blades are not universally interchangeable with stacked dado systems. Before considering one, verify that the table saw manufacturer specifically permits that accessory configuration.
For woodworking that demands consistent groove dimensions and a clean bottom surface, a suitable stacked set is often the more practical option. The final choice should still depend on the saw manufacturer’s approval and the intended work.
How to Choose the Right Dado Blade for Your Table Saw
Choosing a dado set requires more than matching the blade diameter. The saw’s arbor, permitted cutting width, throat opening, motor capacity, and manufacturer-approved accessories all affect compatibility.
1. Check the Table Saw’s Dado Compatibility
This is the most important purchasing consideration.
Some full-size cabinet and contractor table saws support dado stacks, while certain compact and portable models do not. Even when a saw physically accepts a wider cutting assembly, that does not establish that the configuration is approved or safe.
Check the owner’s manual for:
- Maximum permitted dado blade diameter.
- Maximum stack thickness.
- Arbor length and required thread engagement.
- Approved dado blade designs.
- Compatible dado throat plate or insert.
- Required brake cartridge or other safety components.
- Instructions for non-through cutting.
For example, DEWALT’s DWE7491RS documentation specifies an 8-inch maximum dado diameter and a maximum stack thickness of 13/16 inch (20 mm). SawStop specifies an 8-inch stacked dado set with a maximum thickness of 29/32 inch for its supported saw configurations, with an optional dado brake cartridge and insert required.
These specifications are examples, not universal standards. A dado set that fits one table saw may be unsuitable for another.
Never determine compatibility by measuring the arbor and assuming that a blade stack will work. Follow the exact saw manufacturer’s requirements.
2. Select the Correct Blade Diameter
Dado sets are commonly available in 6-inch and 8-inch diameters.
| Diameter | General characteristics | Considerations |
| 6 inches | Smaller cutting diameter | May suit compatible saws with more limited cutting capacity |
| 8 inches | Common stacked dado configuration | Requires explicit saw approval and sufficient clearance |
An 8-inch dado set is not automatically better than a 6-inch set. The appropriate diameter depends on the saw’s permitted accessories, available clearance, and intended cutting depth.
A larger diameter can provide greater potential cutting depth, but the actual usable depth depends on the saw’s blade elevation mechanism and manufacturer limits.
3. Determine the Required Cutting Width
The cutting width determines the thickness of the groove.
For example, a project using nominal 3/4-inch plywood may require a groove sized to the actual panel thickness rather than the nominal measurement.
Plywood thickness can vary between manufacturers and products. A sheet labeled 3/4 inch may not measure exactly 3/4 inch.
Measure the material with a suitable measuring tool before selecting the dado configuration.
A good dado set should provide enough adjustment flexibility to accommodate your common woodworking projects.
4. Consider Tooth Geometry and Construction
Blade construction influences cut quality, durability, and maintenance requirements.
Look at:
- Carbide tooth construction.
- Tooth geometry and cutting arrangement.
- Flatness and condition of the cutting edges.
- Quality of the chipper components.
- Manufacturer specifications for supported materials.
- Recommended sharpening and maintenance procedures.
Carbide teeth are common on quality woodworking blades because they retain cutting edges longer than many conventional steel-tooth designs under comparable conditions. However, carbide construction alone does not guarantee a clean cut.
The blade’s geometry, sharpness, setup, and material also matter.
5. Check the Complete Cost
The advertised price of a dado set may not represent the full cost of using it.
Depending on the table saw, additional purchases may include:
- A compatible dado insert.
- A dedicated brake cartridge.
- Appropriate work-holding accessories.
- A storage case.
- Replacement chippers or other components.
Some table saws require proprietary safety accessories. Include these in your budget before purchasing the blade.
Dado Blade vs. Standard Table Saw Blade
Understanding the differences helps determine whether a dado set is necessary for your woodworking projects.
| Feature | Dado blade setup | Standard table saw blade |
| Main purpose | Wide grooves and rabbets | General cutting |
| Cutting width | Adjustable with compatible stacks | Determined by blade kerf |
| Groove production | Can produce a wider groove in one pass | Usually requires multiple passes |
| Setup | More involved | Generally simpler |
| Accessories | May require a special insert and hardware | Uses the saw’s standard configuration |
| Common applications | Cabinets, drawers, shelves, joinery | Ripping, crosscutting, general woodworking |
| Compatibility | Model-specific restrictions | Generally broader, subject to blade specifications |
A dado set is useful when wide recessed cuts are a regular part of your work. If you only need occasional grooves, a standard blade with a carefully configured series of passes may be a more economical alternative, provided the saw manual permits the method.
However, multiple-pass cutting requires careful setup and consistent workpiece positioning. It should not be treated as automatically safer or more accurate.
What Projects Can You Complete With a Dado Blade?
Dado blades are particularly useful for furniture and cabinet construction because they create joints that help align and support connected pieces.
Cabinet and Bookshelf Construction
A common application is cutting shelf grooves into cabinet sides.
These grooves provide a recessed seating area for shelves, helping maintain their position during assembly.
The groove width should match the actual shelf material, while its depth should provide the required support without unnecessarily weakening the cabinet panel.
Drawer Construction
Dado cuts can create channels for drawer bottoms or other recessed components.
This allows the bottom panel to sit inside the drawer structure instead of simply attaching it underneath.
Before cutting, determine whether the drawer design requires a groove, rabbet, or another joint configuration.
Furniture and Storage Projects
A dado set can also help create:
- Storage compartments.
- Wooden organizers.
- Cabinet dividers.
- Desk components.
- Box-style furniture.
- Shelving systems.
The benefit is repeatability. Once the setup is correctly established, matching grooves can be produced across multiple components.
Rabbet Joints
A rabbet is a recessed cut along an edge or end of a board. It differs from a dado because it is formed at the edge rather than completely surrounded by material.
A suitable dado setup can produce rabbets when the saw configuration and work-holding method support the operation.
Use an appropriate fence arrangement or dedicated jig rather than improvising a setup that exposes the operator to the cutting assembly.
How to Set Up and Use a Dado Blade on a Table Saw
Using a dado blade requires a more involved setup than changing a conventional saw blade. The following workflow explains the general process, but the owner’s manual for your specific table saw and dado set takes priority.
Before starting: Confirm compatibility, read both manuals, wear appropriate eye and hearing protection, use suitable dust extraction, and prepare stable workpiece support.
Step 1: Disconnect the Table Saw From Power
Switch off the saw and disconnect its power supply before changing blades or installing accessories.
Wait until all rotating components have stopped completely. Never attempt to change a blade while the machine is connected to power.
Keep the work area clear of loose wood, tools, and other objects.
Step 2: Inspect the Dado Components
Examine the outer blades, chippers, and shims before assembly.
Check for:
- Cracked or damaged teeth.
- Missing carbide tips.
- Warped cutting components.
- Excessive resin or debris buildup.
- Damaged mounting openings.
- Components that do not fit together correctly.
Do not install damaged or questionable cutting components.
Step 3: Assemble the Required Cutting Width
Determine the groove width from the actual workpiece dimensions.
Arrange the outer blades, chippers, and shims according to the dado manufacturer’s instructions.
Do not assume that every chipper combination is permitted. Some dado manufacturers specify particular arrangements, and certain saw safety systems restrict the types of dado assemblies they support.
The complete assembly must remain within the saw’s maximum permitted stack thickness.
Step 4: Install the Dado Set and Required Insert
Follow the table saw manufacturer’s installation procedure.
Check the arbor mounting requirements, washer arrangement, nut engagement, and tightening instructions. Some saws specify different hardware arrangements depending on the dado width.
Install the correct dado throat plate or insert. The opening must accommodate the cutting assembly without interfering with its movement.
If the saw requires a dedicated brake cartridge, install the approved cartridge before operation.
Never force an insert into position or modify the arbor hardware to make an incompatible dado set fit.
Step 5: Establish the Cutting Setup
Set the required cutting height and align the workpiece against the appropriate guide or jig.
Use a stable miter gauge, sled, fence arrangement, or manufacturer-approved fixture appropriate to the specific operation.
For crosscut-style dado operations, do not trap the workpiece between the blade and rip fence. Select a suitable miter gauge or sled arrangement instead.
Use featherboards, hold-downs, or other appropriate work-holding devices when the operation and saw configuration call for them.
Because conventional blade guards and riving knives may not fit a dado assembly, follow the manufacturer’s non-through-cutting instructions and provide suitable alternative workpiece control. Do not operate with an improvised or incomplete safety arrangement.
Step 6: Verify the Groove on Scrap Material
Before cutting the finished workpiece, check the setup using a suitable scrap piece of the same material.
Inspect the resulting groove for:
- Correct width.
- Consistent depth.
- Clean sidewalls.
- Acceptable bottom finish.
- Proper alignment with the intended joint.
Measure the groove and compare it with the mating component.
If the groove is too narrow or too wide, disconnect power before changing the blade configuration.
Do not adjust the dado assembly while the saw is running.
Step 7: Complete the Cut and Shut Down Safely
Once the setup has been verified, follow the manufacturer’s approved cutting procedure.
Maintain firm control of the workpiece using the appropriate guides and work-holding accessories. Keep hands away from the cutting area and never reach over or behind a rotating blade.
After completing the operation:
- Switch off the table saw.
- Remain at the operating position until the blade stops completely.
- Disconnect power before inspecting or changing the setup.
- Remove chips and debris using an appropriate brush or cleaning tool.
- Inspect the groove and cutting components before storing the accessories.
If the workpiece binds, twists, or begins to move unpredictably, stop the operation. Never attempt to correct a jam by reaching toward the rotating blade.
Dado Blade Safety: Important Risks to Understand
A dado blade removes more material than a standard blade and may require the removal of conventional guarding components. This makes correct machine configuration particularly important.
OSHA identifies kickback, blade contact, and flying particles as major table saw hazards. Its woodworking guidance also discusses the need for suitable jigs, featherboards, and work-holding devices when conventional guards cannot be used for dadoing.
Kickback
Kickback happens when the blade catches the workpiece and throws it toward the operator.
Possible contributing factors include:
- Twisted or unstable workpieces.
- Poor blade condition.
- Incorrect workpiece positioning.
- Inadequate work-holding.
- Improper fence or guide arrangements.
- Cutting material outside the machine’s intended capacity.
Use suitable fixtures, support the workpiece, and stand out of the direct kickback path.
Blade Contact
A dado stack exposes multiple cutting elements across a wider cutting area.
Never place your hands near the cutting assembly to guide a workpiece manually. Use appropriate push devices and fixtures where necessary.
Do not rely on a push stick alone to compensate for an unstable setup.
Flying Wood Chips and Dust
Dado cutting can generate substantial chips and fine wood dust.
Use suitable dust extraction and appropriate respiratory protection based on the material and exposure conditions.
Eye and hearing protection are also important. PPE does not replace correct machine guarding and safe operating practices.
Guard and Riving Knife Restrictions
Some table saws cannot use their standard blade guard or riving knife with a dado assembly.
This does not mean you can simply remove safety components and continue working without alternative controls.
Follow the exact manual and applicable workplace safety requirements. If the required safety configuration cannot be established, do not perform the cut on that machine.
Common Dado Blade Mistakes to Avoid
Even a suitable dado set can produce poor results when installation and workpiece preparation are incorrect.
| Common mistake | Possible consequence | Better approach |
| Buying without checking compatibility | Incorrect fit or unsafe operation | Read the saw manual first |
| Using the wrong cutting width | Loose or overly tight joints | Measure the mating material |
| Installing damaged chippers | Poor cut quality and increased risk | Inspect every component |
| Ignoring arbor requirements | Insecure blade mounting | Follow approved hardware instructions |
| Using the standard throat plate | Insufficient clearance | Install the correct dado insert |
| Feeding unstable material | Binding or kickback | Use appropriate support and fixtures |
| Forcing a deep cut | Increased load and poor control | Follow the manufacturer’s cutting guidance |
| Removing guards without alternative controls | Increased exposure to hazards | Follow approved non-through-cutting procedures |
Another frequent mistake is assuming that a dado blade automatically produces a perfectly flat-bottomed groove. The actual finish depends on the blade design, chipper geometry, setup, and condition of the cutting components.
If the groove will be visible in finished furniture, inspect a sample cut before processing the final material.
Frequently Asked Questions
1. Can You Put a Dado Blade on Any Table Saw?
No. Dado compatibility depends on the saw’s arbor length, maximum permitted blade diameter, stack thickness, throat insert, and safety system. Always check the owner’s manual before purchasing or installing a dado set.
2. What Size Dado Blade Is Best for a Table Saw?
An 8-inch stacked dado set is a common choice for compatible full-size table saws. However, some machines support only 6-inch sets, while others prohibit dado accessories entirely. Follow the manufacturer’s specifications rather than choosing based on size alone.
3. Is a Stacked Dado Blade Better Than a Wobble Blade?
A stacked dado set is generally preferable when consistent groove dimensions and a relatively flat bottom are important. Wobble blades use an angled cutting arrangement and may produce different bottom finishes. Compatibility with the saw’s safety system must also be considered.
4. Can You Cut Dado Grooves Without a Dado Blade?
Yes. A compatible standard table saw blade can produce wider grooves through carefully planned multiple passes or an appropriate alternative cutting method. However, the process requires accurate alignment and safe workpiece control. Follow the saw manufacturer’s instructions.
Final Thoughts
A dado blade for table saw applications is a valuable accessory for cabinetmakers, furniture builders, and DIY woodworkers who regularly need accurate grooves and rabbets. A quality stacked dado set offers adjustable cutting widths and can simplify many joinery operations.
However, compatibility should always come before price, diameter, or brand preference. Check the exact table saw manual, arbor requirements, maximum stack thickness, required insert, and safety-system restrictions before purchasing.
For occasional woodworking, a standard blade and an appropriate alternative cutting method may be sufficient. For regular cabinet and furniture construction, a manufacturer-approved dado set can be a worthwhile addition to the workshop.
The best choice is the one that matches your actual projects, works within your saw’s approved specifications, and allows you to maintain proper workpiece control and safety.
Related guides
- DEWALT 10-Inch Table Saw Review: Price, Specifications, Performance, and Is It Worth Buying?
- Diamond Blade for Circular Saw: How to Choose the Right Blade for Every Cutting Job
- DeWalt 12 Inch Miter Saw Review: Is the DWS780 Worth Buying?
- Craftsman 12 Inch Band Saw Review: Specs, Price, and Is It Worth Buying?




Write Your Review
No reviews yet. Be the first to share your experience!