
What's inside
- What Is a Bench top Drill Press?
- What Can You Use a Bench top Drill Press For?
- How to Choose the Right Bench top Drill Press
- Benchtop Drill Press vs. Handheld Drill
- How to Set Up and Use a Benchtop Drill Press
- Common Benchtop Drill Press Problems
- Bench top Drill Press Maintenance
- Frequently Asked Questions
- Final Verdict
- What Is a Bench top Drill Press?
- What Can You Use a Bench top Drill Press For?
- How to Choose the Right Bench top Drill Press
- Benchtop Drill Press vs. Handheld Drill
- How to Set Up and Use a Benchtop Drill Press
- Common Benchtop Drill Press Problems
- Bench top Drill Press Maintenance
- Frequently Asked Questions
- Final Verdict
As an Amazon Associate I earn from qualifying purchases. This post may contain affiliate links at no extra cost to you.
A bench top drill press is a stationary power tool designed to drill accurate, repeatable holes in wood, metal, plastic, and other compatible materials. Unlike a handheld drill, it holds the drill bit in a fixed vertical position and moves it through the workpiece using a controlled spindle and feed mechanism. This design makes it easier to produce straight holes, maintain consistent drilling depth, and repeat operations across multiple components.
For homeowners, woodworkers, metalworking enthusiasts, and DIY users, a benchtop drill press offers useful workshop capabilities without occupying as much floor space as a full-size industrial machine. However, choosing the right model involves more than comparing motor horsepower. Swing capacity, spindle travel, chuck size, speed range, table adjustment, and overall stability all influence what a machine can accomplish.
This guide explains how a benchtop drill press works, which specifications matter, how to choose an appropriate model, and how to operate and maintain the machine safely.
What Is a Bench top Drill Press?
A bench top drill press is a compact stationary drilling machine designed to mount on a sturdy workbench or suitable stand. It uses an electric motor to rotate a spindle, which holds a drill chuck and compatible cutting accessory.
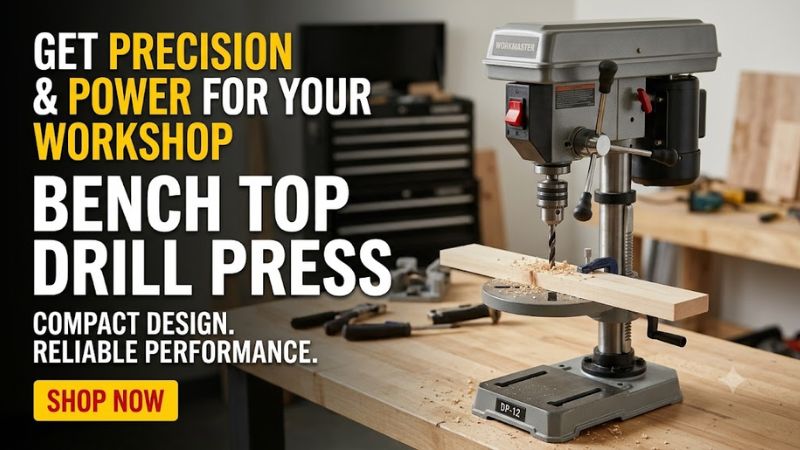
The operator controls the downward movement of the spindle through a feed handle. Meanwhile, the workpiece rests on an adjustable table that can be positioned to accommodate different material sizes and drilling requirements.
Most conventional benchtop drill presses include these components:
| Component | Function |
| Motor | Provides rotational power. |
| Spindle | Rotates the chuck and drill bit. |
| Chuck | Secures compatible drill bits. |
| Quill | Houses the spindle and allows vertical movement. |
| Feed handles | Control drilling movement. |
| Column | Supports the head and worktable. |
| Worktable | Holds and positions the material. |
| Base | Provides the mounting foundation. |
| Depth stop | Helps control drilling depth. |
| Belt and pulleys | Transfer power and provide speed selection on many models. |
Some machines also include laser guides, LED work lights, digital speed displays, and mechanical variable-speed adjustment.
What Can You Use a Bench top Drill Press For?
A benchtop drill press is useful for workshop projects that require consistent hole positioning and controlled drilling.
Common applications include:
- Woodworking: Drilling dowel holes, pilot holes, hardware mounting holes, and openings with compatible Forstner bits.
- Metalworking: Drilling suitable steel, aluminum, brass, and other metals using appropriate cutting accessories.
- Furniture construction: Producing repeatable holes for hinges, brackets, handles, and fasteners.
- Plastic fabrication: Drilling compatible plastic sheets and components.
- DIY repairs: Making accurately positioned holes in replacement parts and workshop materials.
- Small production projects: Repeating the same drilling operation across several workpieces.
A benchtop drill press is primarily designed for drilling. It should not be treated as a milling machine or used for sideways cutting and operations that place unsupported forces on the spindle.
How to Choose the Right Bench top Drill Press
The right machine depends on your typical materials, workpiece dimensions, drilling depth, and frequency of use.
1. Check Swing Capacity
Swing is one of the most important specifications when comparing drill presses. It describes the maximum diameter of a circular workpiece whose center can be positioned beneath the spindle.
It is calculated by doubling the distance between the spindle centerline and the supporting column.
| Drill press size | Spindle-to-column distance | Theoretical workpiece diameter |
| 8-inch | 4 inches | 8 inches |
| 10-inch | 5 inches | 10 inches |
| 12-inch | 6 inches | 12 inches |
| 15-inch | 7.5 inches | 15 inches |
A larger swing gives you more positioning room for wide boards, panels, and metal components. However, it does not indicate the maximum drilling depth or guarantee that the machine can accommodate every workpiece.
Also check the distance between the chuck and worktable. This measurement determines whether the machine has enough vertical clearance for your material and installed drill bit.
2. Consider Spindle Travel
Spindle travel is the maximum vertical distance the spindle can move downward during drilling.
A longer travel distance is useful when drilling deeper holes or working with thicker materials.
For example, the JET JDP-13 benchtop drill press has a manufacturer-listed spindle travel of 3-1/16 inches. Actual usable drilling depth also depends on bit length, chuck position, table arrangement, and workpiece dimensions.
Check spindle travel alongside the distance between the spindle and base. Looking at both measurements provides a better understanding of the machine’s working capacity.
3. Compare Motor Power
Motor power influences how well a drill press handles demanding drilling operations. Large-diameter bits and dense materials generally require more power and suitable spindle speeds.
Understand the difference between these specifications:
- Horsepower (HP): A measurement of motor power.
- Amperage (A): Electrical current drawn or specified by the motor.
- Voltage (V): Required electrical supply.
- RPM: Spindle rotational speed.
Do not choose a machine based on horsepower alone. Transmission design, available speeds, motor characteristics, and manufacturer-rated operating conditions also matter.
For occasional woodworking and general DIY, a compact machine may be sufficient. Frequent metalworking or larger drilling operations may justify a more capable model with suitable low-speed operation.
4. Understand Spindle Speed
Spindle speed is measured in revolutions per minute (RPM). It determines how quickly the drill bit rotates.
Different materials and bit diameters require different speeds. Smaller bits can generally operate at higher speeds, while larger bits usually require slower rotation.
Many benchtop drill presses use one of two adjustment systems:
| Speed system | Operation | Main consideration |
| Multiple-speed | Changes belt positions on stepped pulleys | Provides specific preset speeds |
| Variable-speed | Uses a manufacturer-designed adjustable transmission | Allows finer speed adjustment |
Always follow the machine’s speed chart and the drill bit manufacturer’s recommendations. Do not assume that the highest available RPM is appropriate for every material.
5. Check Chuck Capacity
Chuck capacity determines the maximum compatible drill bit shank diameter.
Common capacities include 1/4 inch, 3/8 inch, 1/2 inch, and 5/8 inch.
A 1/2-inch chuck can hold compatible shanks up to 1/2 inch in diameter. This does not mean the machine can drill a 1/2-inch hole through every material.
Before buying, check the chuck type, mounting arrangement, minimum and maximum supported shank sizes, and spindle specifications.
Forstner bits, hole saws, countersinks, and other accessories should only be used when approved for the machine and correctly rated for the intended operation.
6. Evaluate the Worktable
The worktable supports the material and helps position the drilling location.
Useful features include:
- Adjustable height.
- A secure locking mechanism.
- Tilting capability for approved angled drilling.
- T-slots or provisions for clamping.
- Sufficient surface area for typical workpieces.
A rack-and-pinion adjustment system can make positioning easier. However, a stable locking mechanism is essential because the table must remain secure during drilling.
7. Consider Construction and Stability
Many stationary drill presses use cast iron for the base, column, and worktable. These components contribute to structural rigidity.
Weight alone does not establish machine quality, so also inspect table rigidity, spindle alignment, mounting points, adjustment mechanisms, and available service support.
A benchtop drill press should be secured to a suitable workbench or stand according to the manufacturer’s instructions.
Benchtop Drill Press vs. Handheld Drill
Both machines drill holes, but their advantages are different.
| Feature | Benchtop drill press | Handheld drill |
| Portability | Stationary | Portable |
| Hole alignment | Better control of perpendicular drilling | Depends on operator technique |
| Repeatability | Suitable for repeated operations | Requires consistent positioning |
| Depth control | Adjustable depth stop on equipped models | Depends on tool features |
| Workpiece access | Limited by machine dimensions | Suitable for many awkward locations |
| Installation | Requires mounting space | Minimal setup |
| Typical use | Workshop drilling | Repairs and installation |
Choose a benchtop drill press when accuracy and repeatability matter. Choose a handheld drill when mobility, overhead drilling, or access to large assembled objects is more important.
How to Set Up and Use a Benchtop Drill Press
Correct setup helps produce consistent holes and reduces operating hazards.
Required Equipment
Prepare the following before starting:
- Benchtop drill press with functional guards.
- Compatible drill bit.
- Drill press vise or suitable clamps.
- Appropriate backing board.
- Measuring tape or ruler.
- Center punch for suitable metalworking applications.
- Safety glasses or appropriate eye protection.
- Hearing protection when required.
- Suitable dust collection or ventilation.
- Cutting fluid when recommended for the material.
Secure long hair, remove jewelry, and wear suitable work clothing. Do not wear gloves while operating a drill press because they can become caught in rotating components.
Step 1: Mount the Machine
Place the drill press on a level, sturdy workbench or approved stand.
Use the specified mounting points and fasteners. Make sure the machine cannot shift or tip during operation.
Leave enough room to operate the feed handles, adjust the table, position materials, and reach the power switch.
Step 2: Inspect the Machine
Before connecting power, inspect the power cord, plug, chuck, spindle, guards, table, column, and mounting hardware.
Check that the feed mechanism moves correctly and that the table locks securely.
Do not operate a machine with damaged wiring, missing guards, defective switches, or visible mechanical damage.
Step 3: Install the Drill Bit
Disconnect power before changing accessories.
Open the chuck, insert a compatible drill bit, and tighten it according to the manufacturer’s instructions. Make sure the bit is properly seated and securely held.
Remove the chuck key immediately after tightening. Never leave it in the chuck when starting the machine.
Step 4: Position and Secure the Workpiece
Adjust the worktable to a suitable height and lock it in position.
Mark the drilling location and align it beneath the bit. Use a drill press vise, clamps, or an appropriate fixture to secure the material.
Never hold a workpiece by hand while drilling. If the bit catches, an unsecured workpiece can rotate violently and cause serious injury.
Step 5: Select the Correct Speed
Check the manufacturer’s speed chart and the accessory recommendations.
Consider material type, bit diameter, bit design, and cutting conditions.
For example, a large bit drilling steel generally requires a lower spindle speed than a small bit drilling softwood.
For belt-driven machines, switch off and disconnect power before changing pulley positions. Follow the exact belt adjustment procedure in the manual.
Step 6: Start Drilling
Before starting, verify that the chuck key and adjustment tools have been removed, the workpiece is secure, and the bit is clear of the material.
Start the machine using its normal operating control.
Lower the feed handle gradually and apply enough pressure for the bit to cut without forcing it. Withdraw the bit as necessary to clear chips according to the accessory manufacturer’s instructions.
For suitable metalworking operations, use recommended cutting fluid and reduce feed pressure as the bit approaches breakthrough.
Step 7: Finish and Inspect the Hole
Raise the spindle and switch off the machine.
Wait until the chuck and spindle stop completely before approaching the rotating components. Disconnect power before changing accessories or making adjustments.
Remove chips with a brush or suitable vacuum. Inspect the finished hole for position, diameter, and depth.
Never remove sharp metal chips with your fingers or attempt to stop the chuck by hand.
Common Benchtop Drill Press Problems
Understanding common symptoms helps identify possible problems without assuming a particular diagnosis.
| Problem | Possible cause | Recommended action |
| Drill bit wanders | Poor alignment or unsuitable bit | Check marking, bit condition, and positioning |
| Excessive vibration | Loose mounting or damaged components | Stop and inspect the machine |
| Motor stalls | Excessive feed pressure or unsuitable speed | Check feed pressure and operating conditions |
| Holes are not straight | Table misalignment or unsecured material | Check alignment and workholding |
| Bit overheats | Incorrect speed or cutting conditions | Stop and inspect the bit |
| Belt slips | Incorrect tension or worn belt | Disconnect power and inspect according to the manual |
| Chuck wobbles | Incorrect bit seating or spindle damage | Stop operation and inspect the assembly |
If vibration continues, the spindle appears damaged, or the motor repeatedly stalls under appropriate conditions, discontinue use and consult a qualified service technician.
Bench top Drill Press Maintenance
Regular maintenance helps preserve accuracy and reduce unnecessary wear.
Clean the worktable: Remove chips, dust, and debris after each session. Use a brush or vacuum rather than your hands.
Inspect the chuck: Check for damaged jaws, dirt, and excessive wobble. Replace defective components with approved parts.
Check belts and pulleys: Inspect belt condition and tension according to the manufacturer’s maintenance instructions. Disconnect power before opening the belt cover.
Inspect the table and column: Make sure the table moves correctly and locks securely. Check mounting hardware for looseness.
Protect electrical components: Inspect the cord, plug, and switch for visible damage. Keep the machine dry and follow its electrical requirements.
Do not apply lubricants or adjust internal components unless the manufacturer specifies the correct procedure.
Frequently Asked Questions
1. What is a bench top drill press used for?
A benchtop drill press is used to produce accurate, repeatable holes in wood, metal, and compatible plastics. Its stationary spindle and adjustable worktable provide better control over drilling alignment and depth than most handheld drilling setups.
2. What size bench top drill press should I buy?
A 10-inch or 12-inch model is a practical starting point for many home workshops, but the right size depends on your workpieces. Compare swing, spindle travel, chuck capacity, and vertical clearance before choosing a machine.
3. Can a bench top drill press drill through metal?
Yes, a suitable benchtop drill press can drill compatible metals when equipped with the correct bit and appropriate speed settings. Secure the material with a vise or clamps, use cutting fluid when recommended, and follow the manufacturer’s operating instructions.
4. Is a bench top drill press better than a handheld drill?
A benchtop drill press is generally better for perpendicular, repeatable holes and controlled drilling depth, while a handheld drill is better for portable work and installation tasks. The right choice depends on the application.
Final Verdict
A bench top drill press is a useful workshop investment for anyone who regularly needs accurate, repeatable holes. Its controlled spindle movement, adjustable table, and depth-control features make it suitable for woodworking, metalworking, furniture construction, and general DIY projects.
For occasional workshop use, prioritize adequate swing, reliable table adjustment, suitable chuck capacity, and a practical speed range. For more demanding drilling, pay additional attention to motor capacity, low-speed performance, spindle travel, and workpiece support.
Before purchasing, compare the machine’s working dimensions with the materials you expect to drill. A correctly sized, securely mounted drill press with compatible accessories is more useful than a larger machine whose specifications do not match your projects.
Related guides
- Milwaukee Drill and Impact Set: How to Choose the Right Combo Kit
- DEWALT Drill and Impact Set: What It Includes, How to Use It, and How to Choose the Right Kit
- BLACK+DECKER Cordless Drill: How to Use It, Adjust Settings, and Get Better Results
- Drill and Impact Driver Set: How to Choose the Right Combo for Your Projects
Write Your Review
No reviews yet. Be the first to share your experience!