What's inside
- What Is a Step Drill Bit for Metal?
- When Should You Use a Step Drill Bit?
- How to Choose the Right Step Drill Bit for Metal
- How to Use a Step Drill Bit on Metal
- What Drill Speed and Cutting Oil Should You Use?
- Common Mistakes When Using a Step Drill Bit for Metal
- Step Drill Bit vs. Twist Drill Bit for Metal
- Frequently Asked Questions
- Final Verdict
As an Amazon Associate I earn from qualifying purchases. This post may contain affiliate links at no extra cost to you.
A step drill bit for metal is designed to create or enlarge holes in thin sheet metal using a single stepped cutting tool. It is especially useful for electrical enclosures, metal panels, ductwork, automotive sheet metal, and fabrication projects that require several hole diameters without changing bits.
The best choice depends on the metal you’re drilling, the thickness of the workpiece, the hole diameter you need, and how often you use the bit. For general sheet-metal work, a high-speed steel (HSS) step bit is a practical starting point. For more demanding work, a cobalt-alloy or suitably coated bit may be worth considering—but the manufacturer’s material and thickness ratings should guide the decision.
A step bit is not the right tool for every metalworking job. Thick steel plate, deep holes, and precision holes in demanding materials may require conventional twist drills, annular cutters, or other purpose-built tooling.
What Is a Step Drill Bit for Metal?
A step drill bit is a cone-shaped cutting tool with a series of progressively larger diameters arranged in steps. Each step corresponds to a particular hole size, usually marked on the tool in inches or millimeters.
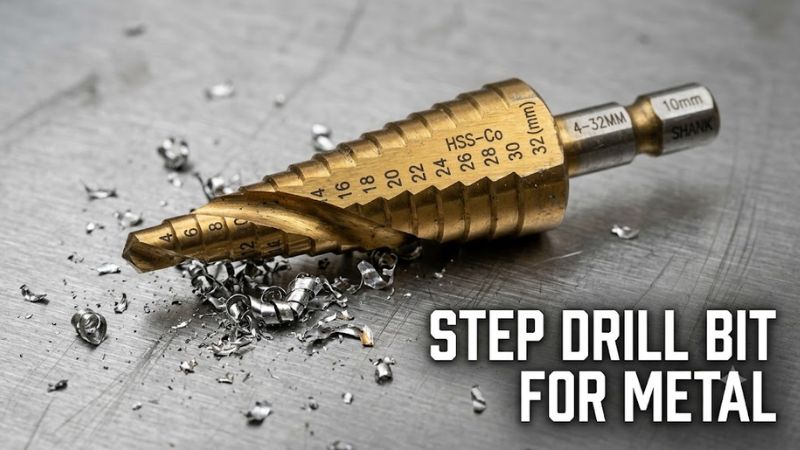
Unlike a conventional twist drill, which generally produces one nominal hole diameter, a step bit can enlarge a hole through several sizes as it advances into the material.
The smaller tip starts the hole, while the wider cutting sections enlarge it as the bit moves farther into the workpiece. Depending on the design and material, the bit may also leave a relatively clean edge that needs less deburring.
How a step drill bit works
- The tip starts a hole in the sheet metal.
- The first cutting step enlarges the opening to its corresponding diameter.
- Each wider step increases the hole size as the bit advances.
- You stop when the desired diameter reaches the workpiece.
The key is to stop at the correct step. Advancing too far produces an oversized hole, which can be difficult or impossible to correct without replacing the workpiece.
When Should You Use a Step Drill Bit?
Step bits are most useful when you need clean, round holes in relatively thin materials and want multiple diameters available on one tool.
| Application | Suitability | Important consideration |
| Electrical enclosures and sheet-metal panels | Excellent for suitable thin sheet | Confirm the required hole diameter and panel thickness |
| Aluminum sheet | Generally suitable | Prevent grabbing and use a lubricant when appropriate |
| Mild-steel sheet | Suitable with the correct bit | Control speed, heat, and cutting pressure |
| Stainless-steel sheet | Conditional | Use a bit explicitly rated for the grade and thickness |
| Plastic panels | Often suitable | Avoid excessive heat and material cracking |
| Thick steel plate | Usually a poor choice | Use a drill designed for the thickness and material |
| Deep holes in solid metal | Not the intended application | Choose an appropriate conventional drill or specialized cutter |
A step bit is particularly convenient for making openings for cable glands, conduit fittings, switches, connectors, and other panel-mounted components. Always check the component’s specified mounting-hole diameter rather than relying on a nominal fitting size.
How to Choose the Right Step Drill Bit for Metal
Four factors matter most: cutting material, diameter range, workpiece thickness, and compatibility with your drill.
1. Choose the right cutting material
High-speed steel (HSS)
A versatile option for general-purpose drilling in suitable sheet metals. HSS is commonly used for workshop and electrical installation tasks where hole sizes vary. Performance depends on the bit’s design, hardness, cutting geometry, and operating conditions.
Cobalt-alloy HSS
A useful option for more demanding applications when the manufacturer specifies the bit for the material involved. Cobalt-alloy grades can retain hardness at elevated temperatures better than conventional HSS, but they do not eliminate the need for proper speed, lubrication, and chip control.
Coated step bits
Black oxide and other coatings can offer particular surface or cutting benefits depending on the tool. A coating does not automatically make a bit suitable for stainless steel, thick plate, or every high-temperature application. Check the manufacturer’s stated material compatibility.
Buying tip: Read the actual material specification, not just the coating color or a product title that says “titanium.” A titanium-nitride coating is different from a bit manufactured from a titanium alloy.
2. Match the diameter range to the hole
Step bits are sold with different diameter ranges and increments. For example, Milwaukee’s official specifications list the #1 Step Drill Bit, model 48-89-9201, for holes from 1/8 to 1/2 inch in 1/32-inch increments. Its #3 model, 48-89-9203, covers 1/4 to 3/4 inch in 1/16-inch increments.
These are examples of two different size ranges, not interchangeable tools. Check the actual size markings and step increments before drilling.
A smaller increment gives you more intermediate hole sizes, while a wider diameter range may be more convenient when drilling larger openings. The best option is the one that includes your required diameter without forcing you to oversize the hole.
3. Check the workpiece thickness
Step bits are primarily intended for sheet metal and other relatively thin materials. The usable cutting depth and geometry vary by model.
Before buying, verify:
- The maximum material thickness approved by the manufacturer.
- The largest required hole diameter.
- The usable length of the cutting section.
- Whether the bit is approved for the specific metal, including stainless steel where applicable.
- Whether the bit’s shape and shank suit the available drill.
Do not assume that a bit capable of making a 1-inch hole can drill 1-inch-thick steel. Hole diameter and material thickness are different capabilities.
4. Check the shank and drill compatibility
Common step-bit shanks include round, three-flat, and hex designs. The shank must fit securely in the drill chuck or the accessory interface specified by the manufacturer.
A hex shank does not automatically mean that a bit is suitable for every impact driver. Some step bits are specifically optimized or rated for impact-driver use; others are intended for conventional drills.
For example, Milwaukee identifies a three-flat shank on its #1 step bit, while its product family includes different shank sizes across models. Check the specification for the exact bit rather than assuming every bit in the same product family is identical.
For general metal drilling, a variable-speed drill gives you better control over the starting speed and cutting process. A drill press can be useful for suitable workpieces when the setup safely accommodates the material and tool.
How to Use a Step Drill Bit on Metal
The following procedure is intended for suitable thin sheet metal. Always follow the instructions for the exact bit and drill, including any specified operating speeds and material restrictions.
Tools and supplies
- A step drill bit rated for the workpiece material.
- A compatible variable-speed drill.
- A vise, clamps, or suitable workholding fixture.
- A center punch and marker, where appropriate.
- Cutting fluid or cutting oil approved for the material and operation.
- Safety glasses or suitable eye protection.
- Hearing protection where required by the noise exposure.
- A file or deburring tool for finishing the hole.
For sheet metal, keep your hands away from the cutting area and secure the workpiece so it cannot spin or lift when the bit engages.
Step 1: Mark the hole location
Measure and mark the center of the opening. Check the location against nearby edges, fasteners, cables, and other components.
If the panel will accept a fitting, use its specified hole diameter. Do not assume the outside diameter of a threaded fitting is the same as the required mounting-hole diameter.
For accurate work, verify the layout before drilling. A hole that is correctly sized but misplaced can still ruin a panel.
Step 2: Secure the workpiece
Clamp the metal firmly to a stable work surface. Use suitable backing or a fixture where necessary, especially with thin sheet that could flex under pressure.
Never hold a loose metal panel in one hand while drilling with the other. If the bit catches, the workpiece can rotate suddenly and cause serious injury.
Make sure the fixture does not obstruct the drill or the intended hole.
Step 3: Fit the bit and check the setup
Disconnect the drill from its power source or remove its battery before changing accessories, following the tool manufacturer’s instructions.
Inspect the step bit for damaged cutting edges, cracks, unusual wear, or a bent shank. Insert it fully into the compatible chuck or holder and tighten it securely.
Confirm that the drill’s direction, speed control, and auxiliary handle—if supplied or required—are set appropriately. Keep the drill aligned with the intended hole.
Step 4: Select an appropriate speed
Use the speed range specified by the bit manufacturer for the material and diameter. If the manufacturer provides a speed chart, follow the entry that corresponds to your application.
Do not assume that the highest available drill speed is the best setting. Excessive speed can generate heat and accelerate cutting-edge wear, while an unsuitable speed or excessive force can also cause poor cutting.
As the cutting diameter increases, the appropriate rotational speed may need to decrease. Exact settings depend on the tool geometry, material, diameter, and operating conditions, so a single RPM value is not suitable for every step bit.
Step 5: Start the hole with controlled pressure
Position the tip at the marked center and hold the drill perpendicular to the sheet.
Start the drill at the recommended speed and apply steady, controlled pressure. Allow the cutting edges to do the work instead of forcing the bit through the material.
If the bit wanders, chatters, or grabs, stop and inspect the setup. Do not compensate by pushing harder or holding the sheet by hand.
Step 6: Enlarge the hole gradually
Allow each step to cut through the material before advancing to the next diameter. Keep the drill aligned and maintain control of the tool throughout the process.
Use cutting fluid when recommended for the metal and bit. Apply it according to its instructions, keeping it away from electrical components and any surface where it could create a slip hazard.
Watch for signs of overheating, such as excessive smoke, discoloration, or a sudden deterioration in cutting performance. Stop if the tool binds, vibrates abnormally, or requires unusual force. Allow the bit and workpiece to cool safely before inspecting them.
Step 7: Stop at the required diameter
Use the engraved markings or the manufacturer’s size chart to identify the correct step. Stop once that step has cut through the sheet and the required diameter has been reached.
Avoid allowing the next step to enter the opening. That can enlarge the hole beyond the required tolerance.
If the hole must accept a gasket, grommet, cable gland, or electrical fitting, verify the finished diameter against the component specification.
Step 8: Shut down, deburr, and inspect
Release the trigger and wait for the drill to stop completely before moving the workpiece or inspecting the cutting area.
Disconnect the power source before removing the bit or adjusting the fixture. Metal chips and the freshly cut workpiece may be hot, so do not touch them immediately.
Remove burrs with a suitable deburring tool or file, taking care not to enlarge the hole unintentionally. Inspect the edge for excessive burrs, deformation, cracks, and damage to any surrounding finish.
Measure the opening if its size matters to the installation. Clean the work area and store the bit dry according to its manufacturer’s instructions.
What Drill Speed and Cutting Oil Should You Use?
There is no single safe, correct RPM or lubricant for every step drill bit used on metal. The appropriate choice depends on the bit’s cutting geometry, diameter, metal type, workpiece thickness, and the manufacturer’s operating guidance.
| Factor | Practical guidance |
| Thin aluminum sheet | Use a bit rated for aluminum and control the feed to prevent grabbing |
| Mild-steel sheet | Follow the specified speed and use suitable cutting fluid when recommended |
| Stainless-steel sheet | Confirm explicit compatibility and follow the manufacturer’s speed and lubrication guidance |
| Larger hole diameters | Check whether a lower rotational speed is specified |
| Heat buildup | Stop, allow safe cooling, and inspect the bit and material |
| Poor cutting performance | Check sharpness, alignment, speed, workholding, and material compatibility |
Cutting oil can reduce friction and heat in appropriate metal-cutting applications. The IDEAL step-bit instructions recommend good-quality cutting oil when drilling metal to support cleaner cutting and longer bit life. That recommendation should not be interpreted as permission to use any lubricant on any material or near any electrical equipment.
Do not use a generic RPM chart unless it matches the actual bit type, diameter, and workpiece material. If the manufacturer does not publish the required setting, obtain guidance for that exact tool instead of guessing.
Common Mistakes When Using a Step Drill Bit for Metal
Avoid these errors to improve hole quality and reduce the risk of damaging the bit or workpiece.
- Using the wrong bit for the metal: A general-purpose bit is not automatically suitable for stainless steel, hardened metal, or thick plate. Confirm the material rating first.
- Drilling with an unsecured panel: Thin sheet can twist or catch. Clamp it securely before starting.
- Running at an unsuitable speed: Excessive heat can wear the cutting edges prematurely. Follow the bit manufacturer’s operating guidance.
- Applying excessive pressure: Forcing the tool can cause grabbing, poor hole quality, or damage. Use controlled pressure and stop if the bit struggles.
- Going past the intended step: Advancing too far can produce an oversized opening. Check the markings and stop at the required diameter.
- Ignoring worn cutting edges: A dull or damaged bit can require more force and produce poor results. Replace or service it according to the manufacturer’s instructions.
- Touching chips immediately after drilling: Metal chips and the workpiece may be hot. Let them cool before handling and remove them with a suitable tool.
- Wearing gloves near rotating equipment: Loose gloves can become caught in rotating machinery. Keep hands and clothing away from the bit, and follow the equipment manufacturer’s guidance on hand protection.
Safety essentials
Wear appropriate eye protection, secure the workpiece, and keep long hair, jewelry, and loose clothing away from rotating parts. Use hearing protection when appropriate for the noise exposure. Do not hold metal by hand while drilling, remove chips while the tool is running, or attempt to clear a jam before the drill has stopped and its power source has been disconnected.
If the bit binds or the workpiece begins to rotate, release the trigger, wait for the tool to stop, and disconnect the power before correcting the setup.
Step Drill Bit vs. Twist Drill Bit for Metal
Both tool types have a place in metalworking. The main difference is the kind of hole and material each is intended to handle.
| Feature | Step drill bit | Conventional twist drill bit |
| Hole diameters | Multiple stepped diameters per bit | Usually one nominal diameter per bit |
| Best use | Many sizes in suitable thin sheet | General drilling across a wider range of applications |
| Hole enlargement | Convenient for progressively enlarging openings | May require changing to a larger bit |
| Thick metal | Generally not the preferred choice | Suitable when the drill and bit are rated for the material and depth |
| Hole depth | Limited by cutting geometry and usable length | Depends on the drill’s length and design |
| Precision | Useful for panel holes within the tool’s capabilities | Often preferable when a specific hole diameter and drilling depth are required |
A step bit is convenient when working with thin sheet metal and several hole sizes. A twist drill is often more suitable when you need a specific diameter in thicker material or a deeper hole. Neither tool is universally superior; the material, hole requirements, and tool specifications determine the right choice.
Frequently Asked Questions
1. Can you use a step drill bit on steel?
Yes, a step drill bit can drill suitable steel sheet when the manufacturer rates it for that material and thickness. Use the specified speed, secure the workpiece, and apply suitable cutting fluid when recommended. Thick steel plate may require a different type of drill bit or cutter.
2. Are step drill bits good for stainless steel?
Some step drill bits are designed for stainless steel, but not all are suitable. Check the exact manufacturer’s material specifications and follow its speed and lubrication recommendations. Stainless steel can generate substantial heat during drilling, so avoid excessive speed, unsuitable feed pressure, and prolonged rubbing with a dull bit.
3. Do you need a pilot hole for a step drill bit?
Not always. Many step bits have a pointed starting tip designed to begin a hole without a separate pilot hole. However, the correct starting method depends on the bit design, material, and application. Follow the manufacturer’s instructions, and do not assume every step bit can start reliably on every surface.
4. Can a step drill bit be used in an impact driver?
Only when the exact bit is rated for that use and its shank fits the tool correctly. Some manufacturers specifically design step bits for compatible impact drivers, while others optimize them for conventional drills. A hex shank alone does not establish impact compatibility. For general-purpose sheet-metal drilling, a variable-speed drill offers useful control.
Final Verdict
A step drill bit for metal is a practical choice for making or enlarging holes in suitable thin sheet metal. It offers multiple hole sizes in one tool and can simplify work on electrical enclosures, panels, ductwork, and fabrication projects.
For most general-purpose jobs, start with an HSS step bit whose diameter range and material rating match your work. Consider a cobalt-alloy or coated option when its specifications better suit your application, rather than assuming a more expensive coating guarantees better results.
Before drilling, confirm the maximum supported material thickness, the required hole diameter, the shank compatibility, and the manufacturer’s speed and lubrication instructions. Secure the workpiece, control heat, stop at the correct step, and inspect the finished hole before installation.
The most useful step drill bit is the one matched to your metal, sheet thickness, and required hole sizes—not simply the one with the widest diameter range.