Our Top Picks
 King&Charles Cabinet Hardware Jig & Automatic Center Punch16 inches2.36 x 16.93 x 2.63 inches1 PoundsCheck on Amazon


What's inside
As an Amazon Associate I earn from qualifying purchases. This post may contain affiliate links at no extra cost to you.
Cabinets punish sloppy setup twice. Once when the doors refuse to line up, and again when the countertop fabricator’s template comes back with a gap you can see from the doorway. The best tools for cabinet installation are not the flashiest things in the truck. They are the ones that let you set a single level reference, pull face frames tight, and drive fasteners into real framing.
Assume nothing in the room is flat, level, or plumb, because it isn’t. A floor that drops 3/8 inch over 12 feet is normal. Your job is to build a straight, level line of boxes anyway. This list is ordered by what to buy first, not by price, and each entry states the job it unlocks. Tools that don’t unlock a job are in the skip section.
As an Amazon Associate we earn from qualifying purchases at no extra cost to you.




| Priority | Tool | Job it unlocks |
|---|---|---|
| 1 | Self-leveling cross-line laser | A level reference for the whole run |
| 2 | Face-frame clamps | Flush, gap-free seams between boxes |
| 3 | Drill and impact driver kit | Pilot holes and screws, no bit swapping |
| 4 | Deep-scan stud finder | Uppers that stay on the wall |
| 5 | Composite shims and a 2-foot level | Square boxes on a bad floor |
| 6 | 18-gauge brad nailer | Toe kick, scribe molding, filler trim |
| 7 | Track saw or circular saw and guide | Clean fillers and scribed panels |
| 8 | Oscillating multi-tool | Notches, pipe cutouts, baseboard trims |
The Buy Order: Best Tools For Cabinet Installation
Buy in this sequence. Each entry assumes you already own everything above it.
1. Self-leveling cross-line laser level
First, because every other decision is downstream of your layout line. Find the high point of the floor, measure up to base cabinet height, and shoot a line around the room. A laser holds that line across corners and doorways while both your hands are busy. A 4-foot level cannot. Get a self-leveling unit with a magnetic bracket and check it against a known line before you start.
Self-leveling cross-line laser level
Spend in the middle of the range, not the bottom. Cheap lasers drift, and a line that wanders an eighth of an inch across a room is worse than no line. Green beams cost more and read easier in a bright kitchen.
2. Face-frame clamps
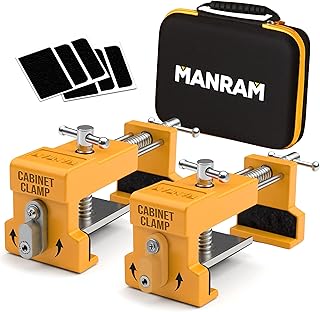
Second, because they fix the defect people notice most: a visible seam between two cabinets. They pull adjacent face frames dead flush while you drill and screw, and they cost less than a good saw blade. Two is the minimum, four is better. Skip padded C-clamps, which slide and dent finished maple.
Cabinet claw face-frame clamps
The cheapest real upgrade to your finished result. Buy a four-pack so you can clamp the top and bottom of two seams at once, and keep scrap blocks handy for soft finished ends.
3. Cordless drill and impact driver, bought as a kit
Third only because most people already own a drill. Two tools means the drill keeps the countersink and the impact keeps the driver bit, which saves a few hundred swaps over one kitchen. Any current 18V or 20V line handles this: DeWalt XR, Milwaukee FUEL, Makita LXT. Pick the battery family you plan to grow and stop shopping.
- ✔ Drill holds the pilot bit, impact holds the driver
- ✔ Sinks 3-inch structural screws without stripping heads
- ✔ One battery platform for your nailer and saw later
4. Deep-scanning stud finder
Fourth, because a loaded upper cabinet on drywall anchors is a liability. A scanner that reads deeper than an inch finds framing through double drywall, plaster, and tile backer. Confirm every hit with a finish nail where the cabinet will cover it, and mark stud centers on painter’s tape so they survive the install.
5. Composite shims, a 2-foot level, and a torpedo level
Fifth, and cheap. Composite shims don’t compress or split like cedar, which matters under a base run carrying stone. The 2-foot level checks each box front to back, the torpedo fits inside a sink base. Buy more shims than you think you need.
Tools That Earn Their Keep Once The Boxes Are Set
6. 18-gauge cordless brad nailer
Toe kick, scribe molding, light rail, and shoe base all go on cleaner with brads than with screws or a hammer. Cordless matters more than power here, because you are working in a finished room on your knees, and dragging a hose past new doors is how they get scratched.
7. Track saw, or a circular saw with a clamp-on straightedge
You will cut finished plywood: end panels, fillers, a dishwasher panel, a scribe against an out-of-plumb wall. A track saw leaves a splinter-free edge on prefinished material in one pass. If this is your only kitchen, a 40-tooth plywood blade, a clamped straightedge, and a scoring pass get you most of the way for far less.
Cordless track saw with guide rail
Worth it if you cut prefinished panels more than a few times a year or break down sheet goods for shop work. For one kitchen, put the money into clamps, shims, and a better blade.
8. Oscillating multi-tool
Last on the list and still on it, because it reaches what nothing else can: baseboard trimmed flush at a cabinet end, a base notched for a supply line, a drain hole cut in a back panel that is already against the wall. Buy a blade variety pack and expect to burn through it.
Fastening: The Part People Get Wrong
Use cabinet or structural screws with washer heads, 2-1/2 to 3 inches, driven into stud centers through the hanging rail. Drywall screws snap under shear load. Screw cabinets to each other first with the face frames clamped flush, then fasten the assembled bank to the wall. Joined boxes behave as one stiff unit and stay in line.
Ledger board before lift. A straight scrap of 1×4 screwed to the studs on your laser line carries every upper cabinet while you drive screws alone. Five minutes, two holes to patch, and it does most of what a rented jack does. Shim behind each screw location so tightening cannot rack the box out of square.
What To Skip
Most cabinet-specific gadgets solve a problem you don’t have. A bubble laser that does not self-level will fight you all day. A bargain four-in-one detector reads studs, wire, and pipe with equal inaccuracy. Rotary cutout tools chew prefinished panels. A full-size table saw hauled on site is slower than a straightedge for the four cuts you actually need.
- ✘ Non-self-leveling bubble lasers
- ✘ Expensive cabinet lifts for a single kitchen
- ✘ Proprietary screw systems with one-off bits
- ✘ Stud finders that can’t read past drywall
- ✘ Hinge-boring jigs unless you drill new doors
Frequently Asked Questions
Can I install cabinets without a laser level? Yes. A 4-foot level and a chalk line struck from the floor’s high point was the standard for decades. Expect more time verifying and more shim fiddling at the end of a long run. The laser buys speed and confidence, not a result you can’t otherwise reach.
Do I need a cabinet jack to hang uppers alone? No. A ledger board screwed to the studs on your layout line holds the cabinet while you fasten it. Jacks pay off for installers doing kitchens weekly, or for very tall ceiling-height boxes.
Should I set base cabinets or uppers first? Uppers, if you want your arms and your countertops to survive. With no bases in the way you can stand close to the wall, and nothing gets set down on a finished top. The exception is a run that has to reference an already finished counter height.
Buy the laser and the clamps before anything else. Those two, plus fasteners you trust and more shims than you planned for, close most of the gap between an install that looks fitted and one that looks approximate. Everything after that is speed.
Check prices on Amazon →