
What's inside
- 1. Understanding the Ryobi 10 Table Saw Models
- 2. What Can a Ryobi 10-Inch Table Saw Cut?
- 3. How to Set Up a Ryobi 10 Table Saw
- 4. Choosing the Right Blade for a Ryobi 10 Table Saw
- 5. How to Make Accurate Cuts With a Ryobi Table Saw
- 6. Safety Precautions When Operating a Ryobi 10 Table Saw
- 7. Maintenance Tips to Keep Your Ryobi Table Saw Working Properly
- 8. Is the Ryobi 10 Table Saw Worth Buying?
- Frequently Asked Questions
- Final Thoughts
- 1. Understanding the Ryobi 10 Table Saw Models
- 2. What Can a Ryobi 10-Inch Table Saw Cut?
- 3. How to Set Up a Ryobi 10 Table Saw
- 4. Choosing the Right Blade for a Ryobi 10 Table Saw
- 5. How to Make Accurate Cuts With a Ryobi Table Saw
- 6. Safety Precautions When Operating a Ryobi 10 Table Saw
- 7. Maintenance Tips to Keep Your Ryobi Table Saw Working Properly
- 8. Is the Ryobi 10 Table Saw Worth Buying?
- Frequently Asked Questions
- Final Thoughts
As an Amazon Associate I earn from qualifying purchases. This post may contain affiliate links at no extra cost to you.
A Ryobi 10 table saw is a practical option for homeowners, DIY enthusiasts, and occasional woodworkers who need a stationary cutting tool for straight, repeatable cuts. Models such as the RTS10G and RTS10NS use a 15-amp corded motor and a 10-inch blade, providing enough capacity for many everyday woodworking and home improvement projects.
However, choosing a Ryobi 10 table saw involves more than checking its blade diameter and motor rating. Buyers should understand the differences between model generations, cutting capacity, fence alignment, blade compatibility, and electrical requirements. Proper setup is equally important because an incorrectly aligned blade or fence can affect cutting accuracy and increase kickback risks.
This guide explains the main features of Ryobi 10-inch table saws, how to prepare them for use, which materials they can handle, and how to maintain them for reliable workshop performance.
1. Understanding the Ryobi 10 Table Saw Models
Ryobi has produced several 10-inch table saw models, and their specifications and included features are not identical. The RTS10G, RTS10NS, RTS11, and RTS22 are examples of models that buyers may encounter when researching this product category.
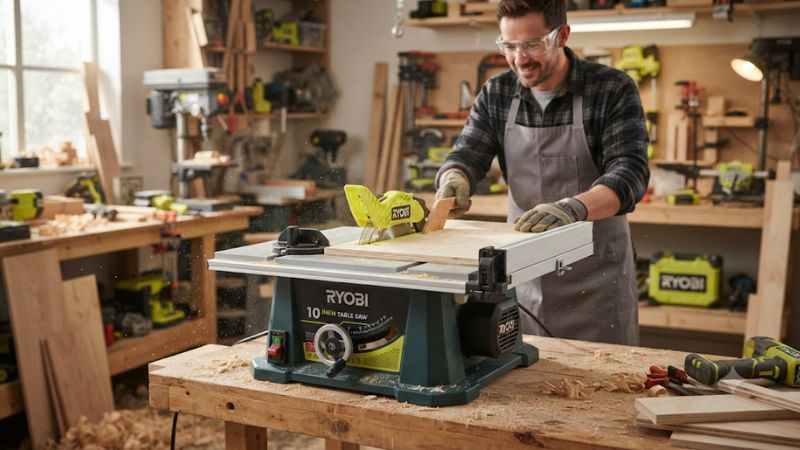
The RTS10G and RTS10NS are particularly relevant when searching for the traditional 15-amp Ryobi 10-inch table saw.
Before purchasing a used or remaining-stock unit, check the model number on its identification label and obtain the corresponding operator’s manual.
Main Specifications of the RTS10G
The RTS10G is a corded table saw designed for general woodworking and home improvement applications.
Its published specifications include:
| Specification | RTS10G |
|---|---|
| Blade diameter | 10 inches |
| Motor input | 15 amps |
| Power supply | 120V AC, 60Hz |
| No-load speed | 5,000 RPM |
| Blade arbor | 5/8 inch |
| Maximum cutting depth at 90° | 3 inches |
| Maximum cutting depth at 45° | 2-1/2 inches |
| Blade bevel range | 0°–45° |
| Table dimensions | 25 x 17 inches |
| Right rip capacity | 12 inches |
| Left rip capacity | 8 inches |
| Blade type supplied | 24-tooth carbide-tipped |
| Warranty | 3-year limited warranty, subject to applicable terms |
These specifications describe the RTS10G configuration, not every Ryobi 10-inch table saw.
The 5,000 RPM figure represents the blade’s no-load rotational speed. Actual cutting performance depends on the material, blade condition, feed rate, and electrical supply.
One important regional consideration is electrical compatibility. The RTS10G specification is based on a 120V, 60Hz supply. It should not be connected directly to a 220–240V household outlet. Buyers outside the US should verify the exact regional model and electrical requirements before purchasing.
RTS10G vs. RTS10NS: What Should Buyers Know?
Although their names are similar, buyers should not assume that every component or accessory is interchangeable.
The RTS10NS is another 15-amp, 10-inch configuration. Its listed features include a carbide-tipped blade, blade guard assembly, anti-kickback pawls, push stick, rip fence, and adjustable miter gauge.
When comparing these models, check:
- Whether a stand is included.
- The exact table and rip capacities.
- Blade guard and riving knife configurations.
- Fence adjustment mechanisms.
- Included accessories and replacement part availability.
- The correct operator’s manual.
A used RTS10G may also have missing safety components or replacement parts that differ from the original configuration. Inspect the actual machine rather than relying entirely on the model description.
2. What Can a Ryobi 10-Inch Table Saw Cut?
A Ryobi 10 table saw is primarily intended for straight woodworking cuts. Its rip fence helps guide boards along the grain, while the miter gauge supports suitable crosscutting operations.
Common applications include:
- Cutting dimensional lumber for shelving and furniture.
- Ripping plywood and suitable wood panels.
- Preparing boards for cabinets and storage projects.
- Cutting hardwood and softwood within the saw’s capacity.
- Producing straight edges for DIY woodworking.
- Making suitable bevel cuts for angled woodworking projects.
The 3-inch maximum cutting depth at 90 degrees provides useful capacity for common lumber sizes.
However, maximum cutting depth does not mean the saw can safely handle every piece of wood within that measurement. Material condition, workpiece stability, blade selection, and available support all influence whether a cut is appropriate.
Ripping vs. Crosscutting
Understanding these two operations helps users choose the correct setup.
Ripping means cutting parallel to the wood grain. The rip fence provides a consistent reference, helping maintain the desired board width.
Crosscutting means cutting across the wood grain. A suitable miter gauge or properly designed crosscutting jig guides the workpiece.
Never use the rip fence as the sole guide for a crosscut when the offcut could become trapped between the fence and blade. This arrangement can create a dangerous kickback situation.
For long boards, provide adequate support on both the infeed and outfeed sides. A table saw’s relatively compact surface cannot safely support every large panel without additional arrangements.
3. How to Set Up a Ryobi 10 Table Saw
Correct setup is essential before making the first cut. Even a functioning saw can produce inaccurate results if its blade, fence, or safety components are improperly installed.
Step 1: Prepare the Work Area
Place the saw on a stable, level surface or install its designated stand according to the operator’s manual.
Check that:
- The machine cannot move during operation.
- The surrounding floor is dry and free from obstacles.
- There is enough room to feed long workpieces.
- The power cord is protected from the cutting area.
- Other people remain outside the operating area.
Avoid positioning the saw where a long workpiece could strike a wall, storage cabinet, or another person.
Step 2: Inspect the Blade and Guard Assembly
Disconnect the power supply before inspecting or adjusting the saw.
Check the blade for missing teeth, cracks, warping, or excessive resin buildup. Confirm that the blade is installed in the correct direction and secured according to the manufacturer’s instructions.
Inspect the blade guard, riving knife, and anti-kickback pawls.
These components have different functions:
- Blade guard: Helps prevent accidental contact with the exposed blade.
- Riving knife: Helps prevent the cut material from closing around the blade.
- Anti-kickback pawls: Help resist backward movement of the workpiece.
Do not operate the saw with damaged, missing, or improperly installed safety components.
Step 3: Check Blade Alignment
The blade should be parallel to the miter gauge slot.
An incorrectly aligned blade can cause the workpiece to bind during cutting, increasing the risk of kickback.
With the saw unplugged, follow the specific manual’s alignment procedure. Use an appropriate precision square or measuring tool to compare the same blade tooth at the front and rear positions.
If adjustment is necessary, follow the model-specific instructions rather than loosening unidentified bolts.
After adjustment, verify the alignment again and check that the riving knife remains correctly positioned.
Step 4: Align the Rip Fence
The rip fence must be parallel to the blade before ripping operations.
Lock the fence and inspect its position using an appropriate measuring tool. Check that the locking mechanism holds the fence securely without noticeable movement.
If the fence is misaligned, use the adjustment procedure in the operator’s manual.
Do not compensate for a poorly aligned fence by changing how you hold or force the workpiece.
Step 5: Check the Miter Gauge
Inspect the miter gauge for damage and excessive looseness.
Slide it through the appropriate miter slot to confirm that it moves without binding. Verify the angle setting with a suitable square when preparing accurate crosscuts.
Make preliminary cuts on scrap material to confirm the setup before working with valuable stock.
4. Choosing the Right Blade for a Ryobi 10 Table Saw
The supplied 24-tooth carbide-tipped blade is suitable for general-purpose cutting, but the best replacement depends on the material and desired finish.
A higher tooth count can provide a cleaner finish in suitable applications, although blade geometry and tooth design matter just as much.
Consider these common blade categories:
| Blade Type | Main Application | Important Consideration |
|---|---|---|
| 24-tooth blade | General ripping | Faster material removal, rougher finish |
| 40-tooth combination blade | General woodworking | Balances ripping and crosscutting |
| 60–80-tooth blade | Fine crosscutting | Requires suitable material and feed technique |
| Specialty plywood blade | Sheet materials | Designed to reduce tearout when used correctly |
For the RTS10G, a replacement blade must match the manufacturer’s requirements, including:
- 10-inch blade diameter.
- 5/8-inch arbor.
- Appropriate maximum RPM rating.
- Suitable cutting application.
- Compatible blade thickness and kerf.
- Correct clearance and compatibility with the riving knife.
Do not assume that every 10-inch circular saw blade is suitable for a table saw.
Avoid damaged blades, inappropriate accessories, and blades with speed ratings below the saw’s operating requirements.
5. How to Make Accurate Cuts With a Ryobi Table Saw
Once the saw has been inspected and aligned, the cutting process becomes more predictable.
Follow these basic procedures.
Making a Rip Cut
- Disconnect power while preparing the setup.
- Measure the required board width.
- Position the rip fence at the correct measurement.
- Lock the fence securely.
- Confirm that the blade guard and anti-kickback components are correctly installed.
- Prepare adequate support for the workpiece.
- Reconnect power and position yourself outside the direct kickback line.
- Start the saw and allow it to reach operating speed.
- Feed the workpiece steadily against the fence without forcing it.
- Use a push stick when the workpiece becomes too narrow for safe hand clearance.
Keep your hands away from the blade path. Never reach over or behind a moving blade to retrieve an offcut.
Making a Crosscut
Use the appropriate miter gauge or a suitable crosscutting jig.
Position the workpiece securely against the gauge and make sure the cut-off section has adequate support.
For long boards, avoid configurations that require excessive hand pressure close to the blade. A properly designed sled or other suitable support arrangement may be necessary.
Never guide a crosscut freehand.
Making a Bevel Cut
The RTS10G supports blade tilt from 0 to 45 degrees.
Before changing the angle:
- Turn off and disconnect the saw.
- Release the bevel locking mechanism.
- Adjust the blade to the required angle using the saw’s adjustment control.
- Secure the bevel lock.
- Verify the angle with an appropriate measuring tool.
- Confirm that the workpiece and blade guard are correctly positioned.
Remember that maximum cutting depth decreases when the blade is tilted. The RTS10G’s listed maximum depth at 45 degrees is 2-1/2 inches.
6. Safety Precautions When Operating a Ryobi 10 Table Saw
Table saws can cause severe injuries, particularly through direct blade contact and kickback. Following safe operating practices is essential, regardless of the machine’s size or price.
Important precautions include:
Wear suitable PPE. Use appropriate eye protection and hearing protection. Consider respiratory protection when working in dusty conditions, based on the material and dust-control arrangements.
Keep the blade guard installed. Use the guard and other supplied safety devices for operations where they are intended.
Use push sticks and push blocks. These accessories help maintain hand clearance when handling narrow or small workpieces.
Stand out of the kickback line. Position yourself to the side of the blade rather than directly behind the workpiece.
Inspect materials before cutting. Avoid wood containing hidden nails, screws, cracks, loose knots, or other defects that could affect the cut.
Never force the material. If the workpiece binds, stop the saw and disconnect power before investigating.
Wait for the blade to stop. Do not remove scraps or make adjustments while the blade is rotating.
Avoid loose clothing and jewelry. Tie back long hair and keep anything that could become entangled away from moving parts.
Also, do not wear gloves near an exposed rotating blade. Gloves can become caught in moving machinery.
For workshop dust control, use an appropriate extraction arrangement and follow the material manufacturer’s safety guidance. A dust collection system does not eliminate the need to manage airborne dust.
7. Maintenance Tips to Keep Your Ryobi Table Saw Working Properly
Regular inspection helps identify problems before they affect cutting quality or safety.
Clean the Table and Interior
Disconnect the saw before cleaning.
Remove accumulated sawdust and debris from accessible areas using an appropriate cleaning method. Keep the table surface clean so the workpiece can slide without catching.
Do not direct compressed air into areas where it could force dust deeper into the motor or bearings.
Inspect the Blade
Check the blade periodically for dull teeth, damage, resin buildup, and unusual vibration.
Replace a damaged blade rather than continuing to use it. A dull blade can increase cutting resistance and contribute to binding.
Check the Fence and Miter Gauge
Inspect both components for wear and damage.
Verify fence alignment whenever the saw has been moved, adjusted, or subjected to an impact. Check that the fence locking mechanism remains secure.
Inspect the Power Cord and Switch
Look for damaged insulation, loose connections, unusual heat, or signs of electrical deterioration.
Do not use the machine if its cord, plug, or switch is damaged. Electrical repairs should be handled by qualified personnel.
Store the Saw Correctly
When the saw is not being used, disconnect it from power and protect it from moisture, excessive dust, and accidental impact.
Store accessories in their designated locations and keep the operator’s manual available for future adjustments and maintenance.
8. Is the Ryobi 10 Table Saw Worth Buying?
A Ryobi 10 table saw can be a sensible choice for users who need a relatively straightforward corded machine for occasional woodworking.
Its 15-amp motor, 10-inch blade, and 3-inch maximum cutting depth on the RTS10G provide useful capacity for many household projects.
However, its compact work surface and limited rip capacity make it less suitable for large sheet materials and demanding production work.
It may suit:
- Homeowners completing occasional woodworking projects.
- DIY enthusiasts building shelves and simple furniture.
- Hobbyists cutting dimensional lumber.
- Users who already have a suitable workshop space.
- Buyers seeking an affordable used table saw with available replacement parts.
It may not suit:
- Professional workshops requiring daily production.
- Woodworkers regularly processing full-size plywood sheets.
- Users requiring extensive outfeed support.
- Projects demanding advanced fence adjustments and precision features.
- Buyers who need a cordless machine.
When purchasing a used model, inspect the blade, fence, table, motor operation, electrical components, and safety accessories. A low purchase price is not necessarily good value if important components are missing or damaged.
Also consider the cost of replacement blades, measuring equipment, dust extraction, support equipment, and any necessary repairs.
Frequently Asked Questions
1. How deep can a Ryobi 10-inch table saw cut?
The RTS10G has a maximum cutting depth of 3 inches at 90 degrees and 2-1/2 inches at 45 degrees. Actual usable capacity depends on the workpiece and correct setup.
2. Can I use a different blade on my Ryobi 10 table saw?
Yes, provided the replacement blade meets the exact model’s specifications. For the RTS10G, the published blade diameter is 10 inches and the arbor is 5/8 inch. Check kerf, blade thickness, RPM rating, and riving knife compatibility before installation.
3. Why does my Ryobi table saw make inaccurate cuts?
Common causes include an improperly aligned rip fence, blade misalignment, an inaccurate miter gauge, a dull blade, or unstable workpiece support. Disconnect power before inspecting or adjusting the machine.
4. Is the Ryobi RTS10G suitable for professional woodworking?
The RTS10G can handle many basic woodworking operations, but its compact table, limited rip capacity, and relatively basic adjustment features make it better suited to occasional DIY and hobby use than demanding professional production.
Final Thoughts
The Ryobi 10 table saw offers practical cutting capacity for common home improvement and woodworking tasks. Models such as the RTS10G and RTS10NS provide a useful starting point for buyers who want a straightforward corded table saw without moving into more expensive workshop equipment.
The most important considerations are identifying the exact model, checking its electrical compatibility, verifying blade and fence alignment, and ensuring that all safety components are present and functional.
For occasional projects involving lumber, shelving, and smaller wood panels, a properly maintained Ryobi 10-inch table saw can be a useful workshop machine. However, users who regularly process large sheet goods or require professional-level production capacity should consider a larger and more capable table saw.
Related guides
More from Amazon
Programs that pair well with the guide above. Offers and eligibility are set by Amazon and may change.
A free business account with business pricing and bulk-buying tools for work, shop or home office.
Create a business accountFree shipping on eligible items, Prime Video and more. Eligible new members can start with a free trial.
Start a Prime free trialAudiobooks and podcasts to listen to on the go. Eligible new members can start with a free trial.
Try Audible freeAd-free music streaming. Eligible new subscribers can start with a free trial.
Try Music Unlimited freeAs an Amazon Associate we earn from qualifying purchases.


Write Your Review
No reviews yet. Be the first to share your experience!