What's inside
- Quick comparison of multi tool grout blades
- Carbide grit versus diamond grit
- Choose the width by measuring the joint
- Best choice by repair situation
- Compatibility: not every multi tool blade fits every tool
- How to remove grout without damaging tile
- Durability and ownership costs
- Final buying recommendation
- Quick comparison of multi tool grout blades
- Carbide grit versus diamond grit
- Choose the width by measuring the joint
- Best choice by repair situation
- Compatibility: not every multi tool blade fits every tool
- How to remove grout without damaging tile
- Durability and ownership costs
- Final buying recommendation
As an Amazon Associate I earn from qualifying purchases. This post may contain affiliate links at no extra cost to you.
The best multi tool grout blade for most bathroom repairs is a carbide-grit blade about 1/8 inch wide; choose a narrower 1/16-inch blade for tight joints, a wider 1/4-inch blade for rapid floor-grout removal, and diamond grit when you need maximum wear resistance.
An oscillating tool is useful for removing damaged grout because it can work in corners and along short repair sections without the kickback of a rotary tool. The important choice is not simply the brand. Width, abrasive type, cutting depth, joint size, and your control of the tool determine whether you remove grout cleanly or chip the tile edges.
As an Amazon Associate we earn from qualifying purchases at no extra cost to you.
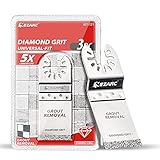


Quick comparison of multi tool grout blades
| Blade type | Common width | Typical useful depth | Best use | Expected wear behavior |
|---|---|---|---|---|
| Carbide-grit narrow blade | 1/16–3/32 in (1.6–2.4 mm) | About 3/8–1/2 in (10–13 mm) | Thin wall joints, corners, and precise repairs | Fast enough for small jobs; grit gradually smooths |
| Carbide-grit standard blade | 1/8 in (3.2 mm) | About 1/2–5/8 in (13–16 mm) | Most bathroom wall and floor grout | Good value and predictable cutting |
| Carbide-grit wide blade | 1/4 in (6.4 mm) | About 1/2–5/8 in (13–16 mm) | Wide floor joints and rapid material removal | Efficient, but easier to wander into tile |
| Diamond-grit blade | 1/16–1/8 in (1.6–3.2 mm) | About 1/2–5/8 in (13–16 mm) | Hard, dense, epoxy-containing, or extensive grout work | Usually lasts longer, but costs more |
| Segmented or plunge-cut carbide blade | Approximately 1–1 3/8 in cutting span | Often up to about 1–1/2 in (38 mm) | Starting an access cut or removing adjacent materials | Not a substitute for a narrow grout blade |
Published dimensions vary by manufacturer, and the abrasive cutting depth is not the same as the safe working depth. Treat the table as a selection guide, then confirm the blade package before buying.
Carbide grit versus diamond grit
Carbide-grit blades: the practical choice
A carbide-grit grout blade has abrasive particles bonded to a metal edge. It is generally the best grout blade for an oscillating tool when the job involves ordinary cement-based grout and fewer than several dozen linear feet of joints. Carbide blades are commonly less expensive, remove material quickly, and are available in several widths.
They are especially suitable for isolated shower-wall repairs, replacing cracked grout around a bath, or cleaning a few floor joints before regrouting. The grit eventually becomes rounded or loses particles. Pressing harder near the end of the blade’s life increases heat and makes the tool harder to control, so replacement is usually better than forcing it.
Diamond grit: slower investment, longer service
Diamond-grit blades use diamond particles bonded to the cutting surface. They make sense for large tiled floors, very hard grout, or grout containing aggressive additives. A diamond blade can remain usable for substantially longer than a carbide blade, although its higher purchase price is difficult to justify for one small repair.
Diamond is not automatically safer for tile. A wide, aggressive blade can still scratch glazed ceramic or porcelain if it contacts the edge. Its advantage is wear resistance, not permission to work carelessly. Use light pressure and keep the blade centered in the joint.
Choose the width by measuring the joint
Measure the grout joint at several points rather than assuming every joint is identical. The blade should be narrower than the joint, leaving a visible strip of grout on both sides during the first pass. For example, a 1/8-inch multi tool grout blade is appropriate for a joint measuring roughly 3/16 inch or more. It is too wide for a tight 1/16-inch joint.
- 1/16 inch: Best for narrow wall grout and delicate tile layouts. It removes material more slowly but gives the greatest margin from the tile edges.
- 3/32 inch: A useful compromise for slightly wider joints where a 1/16-inch blade feels inefficient.
- 1/8 inch: The most versatile size for common bathroom grout and many floor repairs.
- 1/4 inch: Suitable for broad floor joints, but use it only when the joint is clearly wider than the blade.
If the joint is narrower than the available blade, do not tilt the blade sideways to make it fit. That exposes the blade corner to the tile and can chip the glaze. Buy a narrower grout multi tool blade instead.
Best choice by repair situation
| Your situation | Recommended specification | Why |
|---|---|---|
| First-time user repairing a few wall joints | 1/16 or 1/8 in carbide grit | Affordable and easier to control than a wide blade |
| Several damaged joints on a bathroom floor | 1/8 in carbide grit, with a spare | Good balance between speed, access, and cost |
| Large floor with wide joints | 1/4 in carbide or diamond grit | Removes more material per pass; diamond suits longer work |
| Very hard or epoxy-containing grout | Narrow diamond grit | Better resistance to rapid abrasive wear |
| Glossy porcelain or brittle ceramic tile | Narrow blade, slower speed, shallow passes | Maximizes clearance from the glazed edge |
| Occasional homeowner use | Universal-fit 1/8 in carbide blade | Usually the lowest ownership cost for small repairs |
Compatibility: not every multi tool blade fits every tool
Check whether the blade uses a universal open-back mounting pattern, a brand-specific interface, or an adapter. A grout blade for a multi tool must clamp firmly without rocking. Brands such as Bosch, Dremel, Fein, and Milwaukee sell oscillating-tool accessories, but compatibility depends on the exact tool interface and model generation. A blade described as “universal” may fit many open interfaces but not every proprietary quick-change system.
Also check the blade’s intended direction and mounting orientation. Some accessories can be installed in multiple positions; others are designed to sit flat against the tool head in one orientation. A loose or misaligned blade can vibrate, cut unevenly, and damage the clamp.
How to remove grout without damaging tile
- Protect the work area. Remove loose objects, cover nearby surfaces, and wear eye protection and a suitable dust mask. Dry grout dust is fine and spreads quickly.
- Mark the stopping points. Use painter’s tape to identify the repair boundaries. Avoid cutting into corners where flexible sealant, rather than grout, belongs.
- Start at low speed. Set the oscillating tool below its maximum speed and let the abrasive work. High speed and heavy pressure generate heat and make the blade jump.
- Make a shallow center pass. Keep the blade parallel to the joint and begin in the middle of the grout, not against the tile edge. Remove roughly 1/8 inch at a time.
- Widen gradually. Once a groove is established, make controlled passes toward the remaining grout. Keep both tile edges visible whenever possible.
- Stop before the substrate. Remove enough grout for the new material to bond, commonly at least half the joint depth, but do not cut into waterproofing, backer board, or underlayment.
- Vacuum and inspect. Use a brush and vacuum to clear dust. Clean, dry sides are more important than making the joint unnecessarily deep.
For a 20-foot repair with joints averaging 1/8 inch, a careful homeowner may need several controlled passes rather than one continuous cut. If a carbide blade effectively covers about 8–15 linear feet before becoming noticeably slow, budgeting two blades is more realistic than expecting one accessory to finish every floor or wall.
Durability and ownership costs
The abrasive coating is usually the first part to wear, not the oscillating tool itself. Cement residue can also pack into the teeth or grit. Let the blade cool, brush it clean with a stiff nylon brush, and inspect the mounting hole for distortion. Do not quench a hot blade in water; sudden cooling can stress the metal and does not restore worn grit.
A rough cost-per-use comparison illustrates when premium blades make sense. Suppose a carbide blade costs $15 and completes one 10-foot repair, while a diamond blade costs $35 and completes four similar repairs. The carbide cost is about $1.50 per repair; the diamond cost is about $8.75 per repair. On those assumptions, carbide is the better occasional-use choice. For repeated renovation work, actual life, downtime, and the risk of changing blades may justify diamond despite the higher initial price.
Replace a blade when it cuts slowly despite light pressure, produces excessive vibration, has missing abrasive patches, or no longer stays centered in the joint. Forcing a worn multi tool blade for grout removal is a common cause of accidental tile contact.
Final buying recommendation
Buy a 1/8-inch carbide-grit blade if you need one versatile accessory for ordinary bathroom and tile repairs. Add a 1/16-inch blade for narrow wall joints or expensive tile, and choose a 1/4-inch blade only for genuinely wide floor joints. Select diamond grit when the grout is unusually hard or the job is large enough that repeated carbide replacement becomes inconvenient. Whichever type you choose, a blade narrower than the joint, shallow passes, and light pressure offer the best protection against tile damage.